Meet Scholar9
Scholar9 is a globally accessible integrated academic research ecosystem — connecting scholars, institutions, journals, and publishers under one unified platform.
What is Scholar9?
Scholar9 (scholar9.com) is a comprehensive academic platform built to serve the complete lifecycle of scientific research — from discovery and peer collaboration to journal publication and indexing. It is designed for three core audiences:
- Researchers & Ph.D. Scholars — Build a verified academic profile, discover publications, and connect with expert mentors.
- Academic Institutions — Register institution pages, track affiliated faculty publications, and boost research visibility.
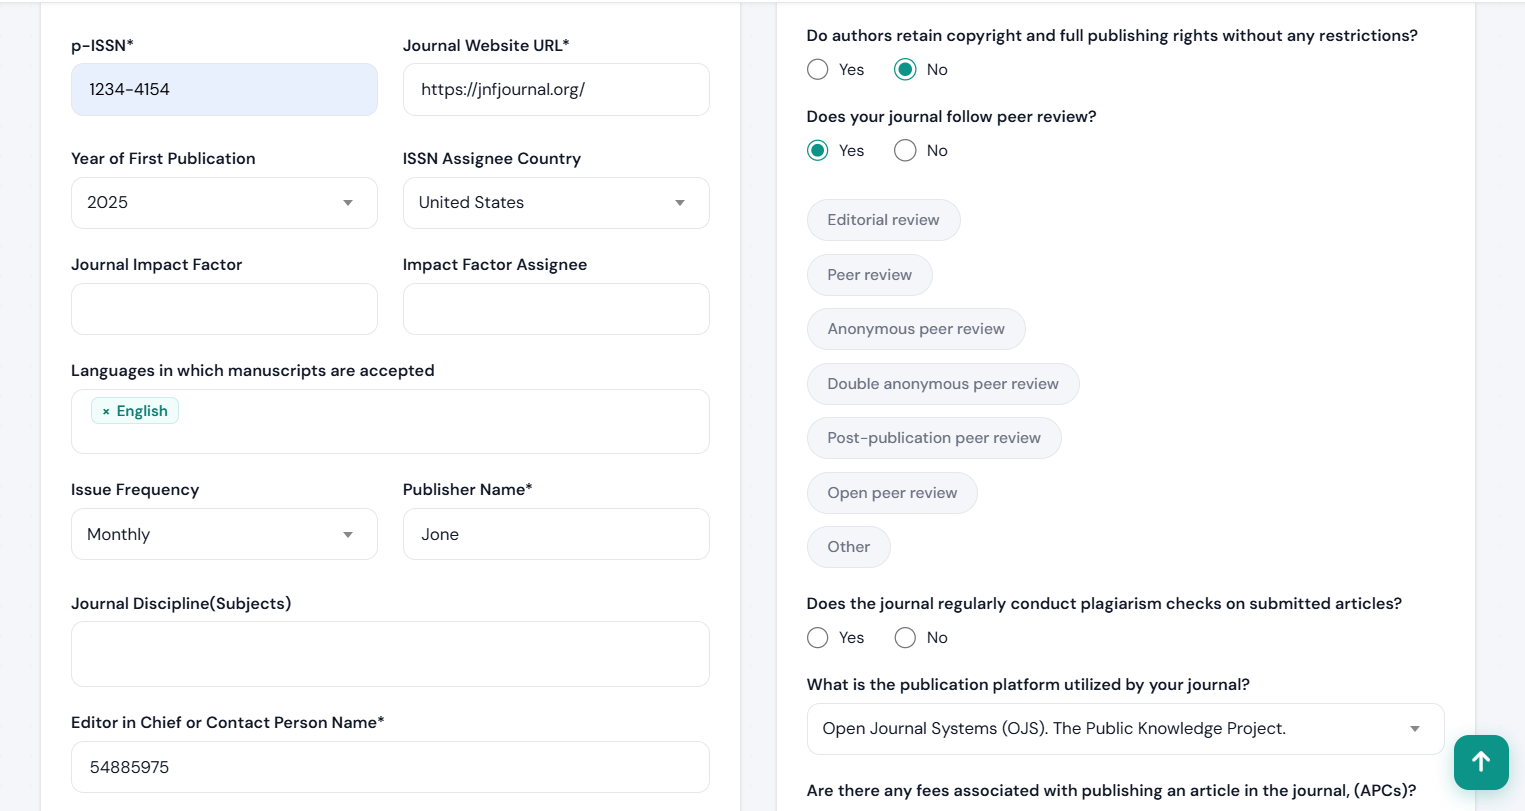
- Journal Publishers — Manage full manuscript workflows, assign peer reviewers, and maintain compliance with UGC CARE / Scopus standards. (Seamless DOI registration available via GetDOI.com)
For a detailed overview of what Scholar9 is and how it works — Read: What is Scholar9?
Core Platform Pillars
Every feature of Scholar9 is built around four foundational pillars:
Related Platforms in the Scholar9 Family
Scholar9 is part of a broader ecosystem of independent academic platforms. Each operates as its own separate website, purpose-built for a specific academic need. You can access them individually:
- ScholarJMS — A standalone Journal Management System for manuscript submission, editorial workflows, and peer review coordination. Publishers access this platform independently to manage their journal operations. Visit ScholarJMS
- ScholarMeet — A separate platform dedicated to academic conference and seminar discovery, registration, and event networking for researchers. Visit ScholarMeet
- RJ Publication — An independent open-access journal directory specifically for UGC CARE listed journals, helping scholars discover compliant journals for submission. Visit RJ Publication
- GetDOI — A standalone Crossref DOI registration service operated separately, used by publishers to register permanent Digital Object Identifiers for their published articles. Visit GetDOI
How to contact Scholar9?
You can contact us directly via phone or email for any support or inquiries. For full contact details, or to send us a direct message, please visit our Contact Us page.
- Phone & Email: Find our direct contact number and official email address.
- Online Form: Fill out your query directly on the page and our team will get back to you promptly.
- Business Hours: Monday to Saturday, 10:00 AM to 6:00 PM.
Click here to go to the Contact Us page where you can find our phone number, email address, and an online inquiry form.
Why Scholar9?
How Scholar9 compares to other academic platforms — and why it is the right choice for researchers and journals globally.
Platform Comparison
There are several international academic platforms available, but Scholar9 is purpose-built for the academic ecosystem with localized compliance, affordable pricing, and integrated tools that global platforms do not offer together.
| Feature | Scholar9 | Other Platforms |
|---|---|---|
| Verified Academic Profile | ||
| DOI Registration | ||
| UGC CARE / Scopus Ready | ||
| Full Manuscript Workflow | ||
| Expert Mentorship Booking | ||
| Q&A Academic Forums | ||
| Free for Scholars |
Key Differentiators
- UGC CARE Aware: Scholar9's publisher tools are specifically designed to help journals meet UGC CARE listing requirements — something other platforms do not offer.
- Seamless DOI Integration: Publishers can register new DOIs efficiently using our dedicated service via ScholarJMS and GetDOI.com.
- Global Accessibility: Scholar9 is designed for researchers worldwide, with multi-language support and currency options for international users.
Ecosystem Quick Start Guide
Welcome to the Scholar9 Quick Start Hub! Establish your scholarly presence, catalog dynamic research publications, and build scientific co-author relationships quickly.
Three Core Onboarding Goals
To maximize platform efficiency and unlock index database tools, complete these baseline configurations:
Creating Your Scholar9 Account
Getting started with Scholar9 is simple. Follow these steps to create your account and access the full research ecosystem — available globally.
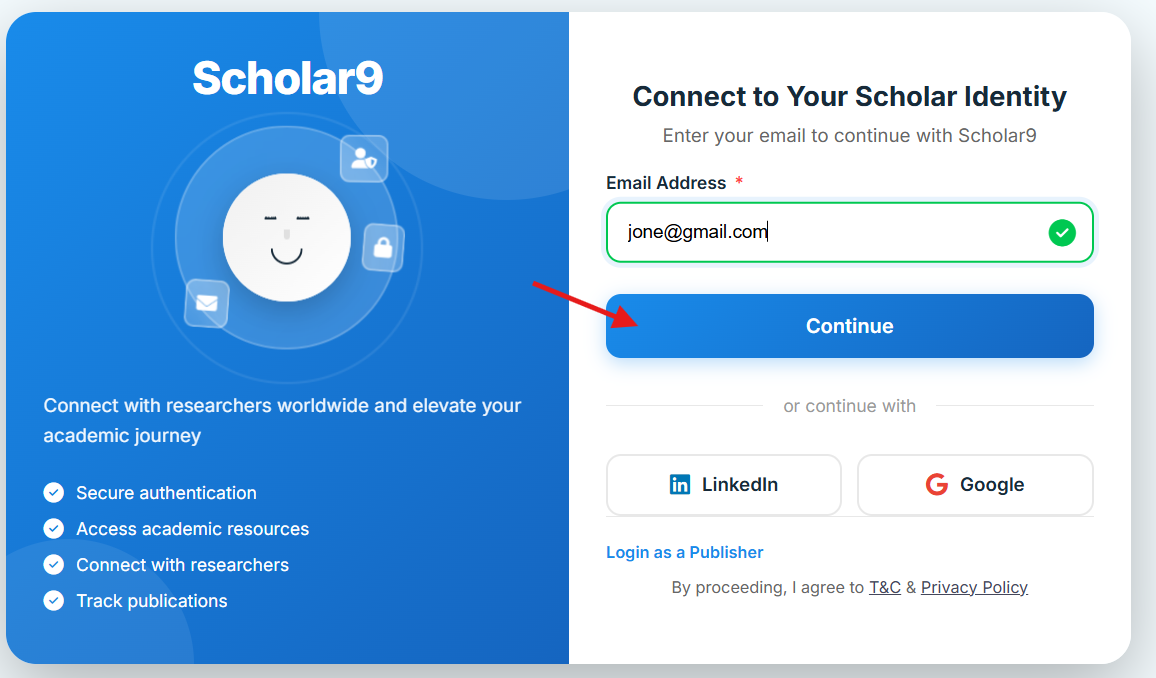
Step 1 — Visit the Sign-Up Page
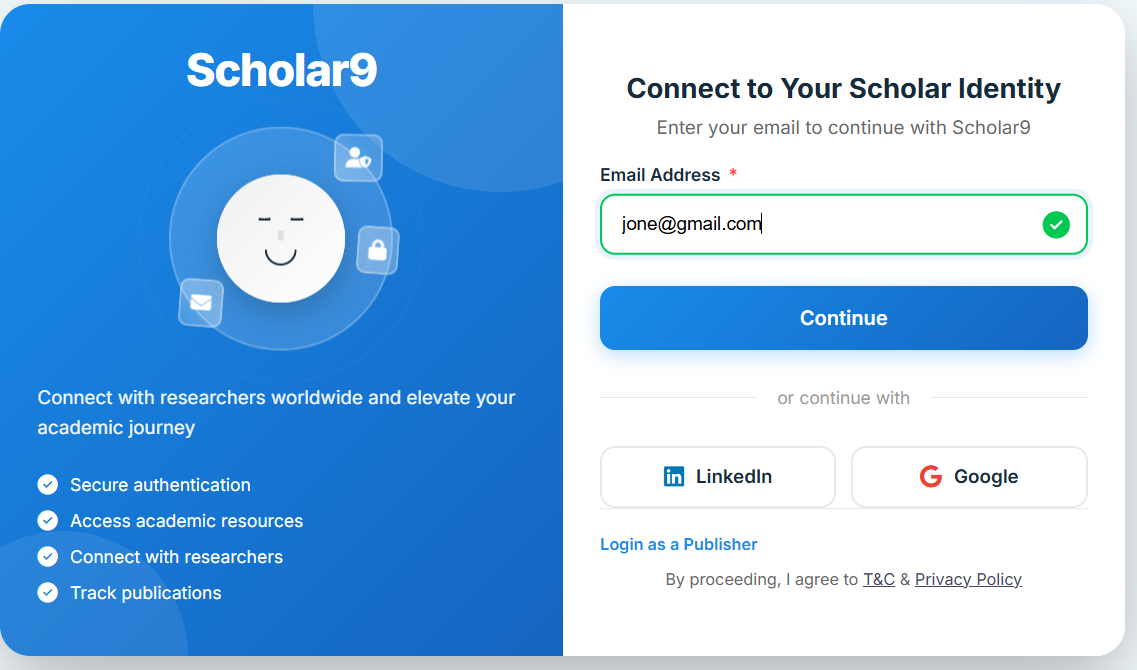
Go to scholar9.com and click the "Login/Sign Up" button on the header. You will see the Scholar9 onboarding page where you can enter your email address to get started. The page has a clean, friendly design that guides you through the process.

Step 2 — Enter Your Email Address
Type your email address in the input field. As you type, the form validates your email in real time. Once a valid email is detected, the field shows a confirmation checkmark to let you know it is ready.
Step 3 — Click Continue
Click the "Continue" button. Scholar9 checks your email against its database and automatically decides the next step for you — no need to choose manually.
What Happens Next?
Based on whether your email is recognized, Scholar9 takes you down one of two paths:
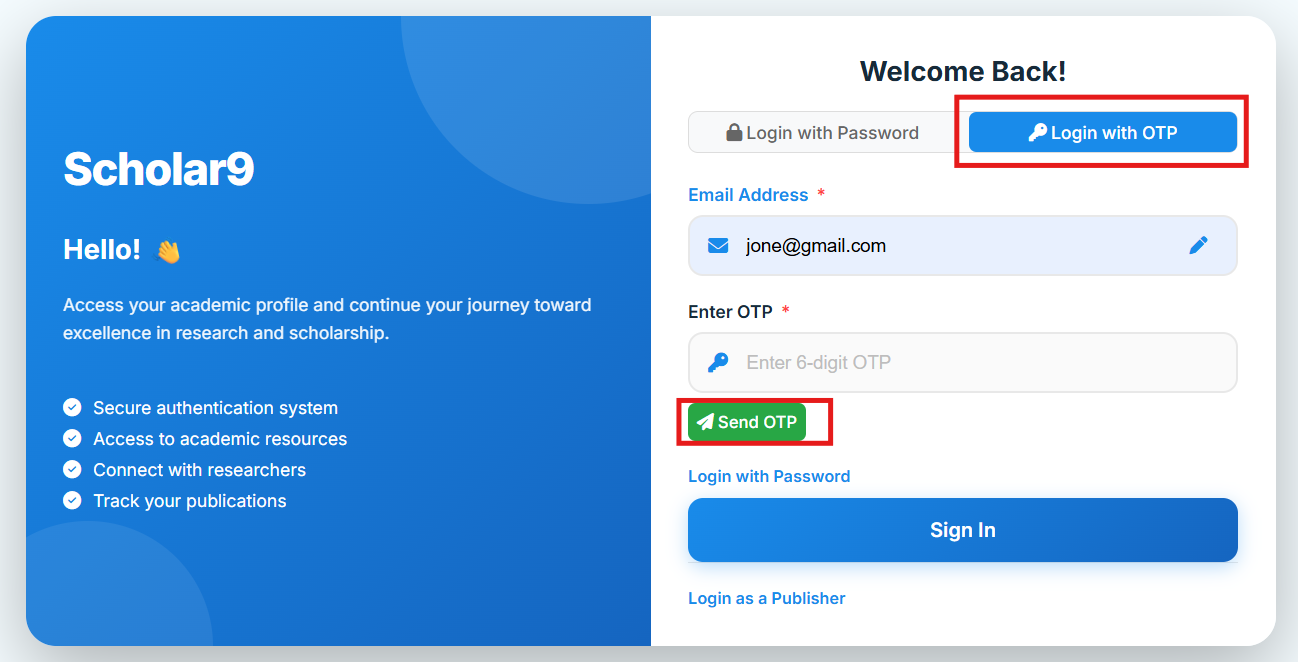
Dual Authentication Tracks (Login Screen)
Upon redirecting to the login screen, existing users can choose between two convenient and highly secure authorization methods:
Option A — Login with Password
If you are a returning user, enter your account password to sign in. You can use the eye icon on the password field to show or hide your password for convenience. If you want to change your email, simply click the edit button (marked with a red box) next to your email address.

Option B — Login with OTP (No Password Needed)
Prefer not to use a password? Switch to the OTP login option. Scholar9 will send a 6-digit one-time code to your registered email. Enter the code to sign in. A 60-second timer prevents the code from being reused. You can request a new code after the timer expires.
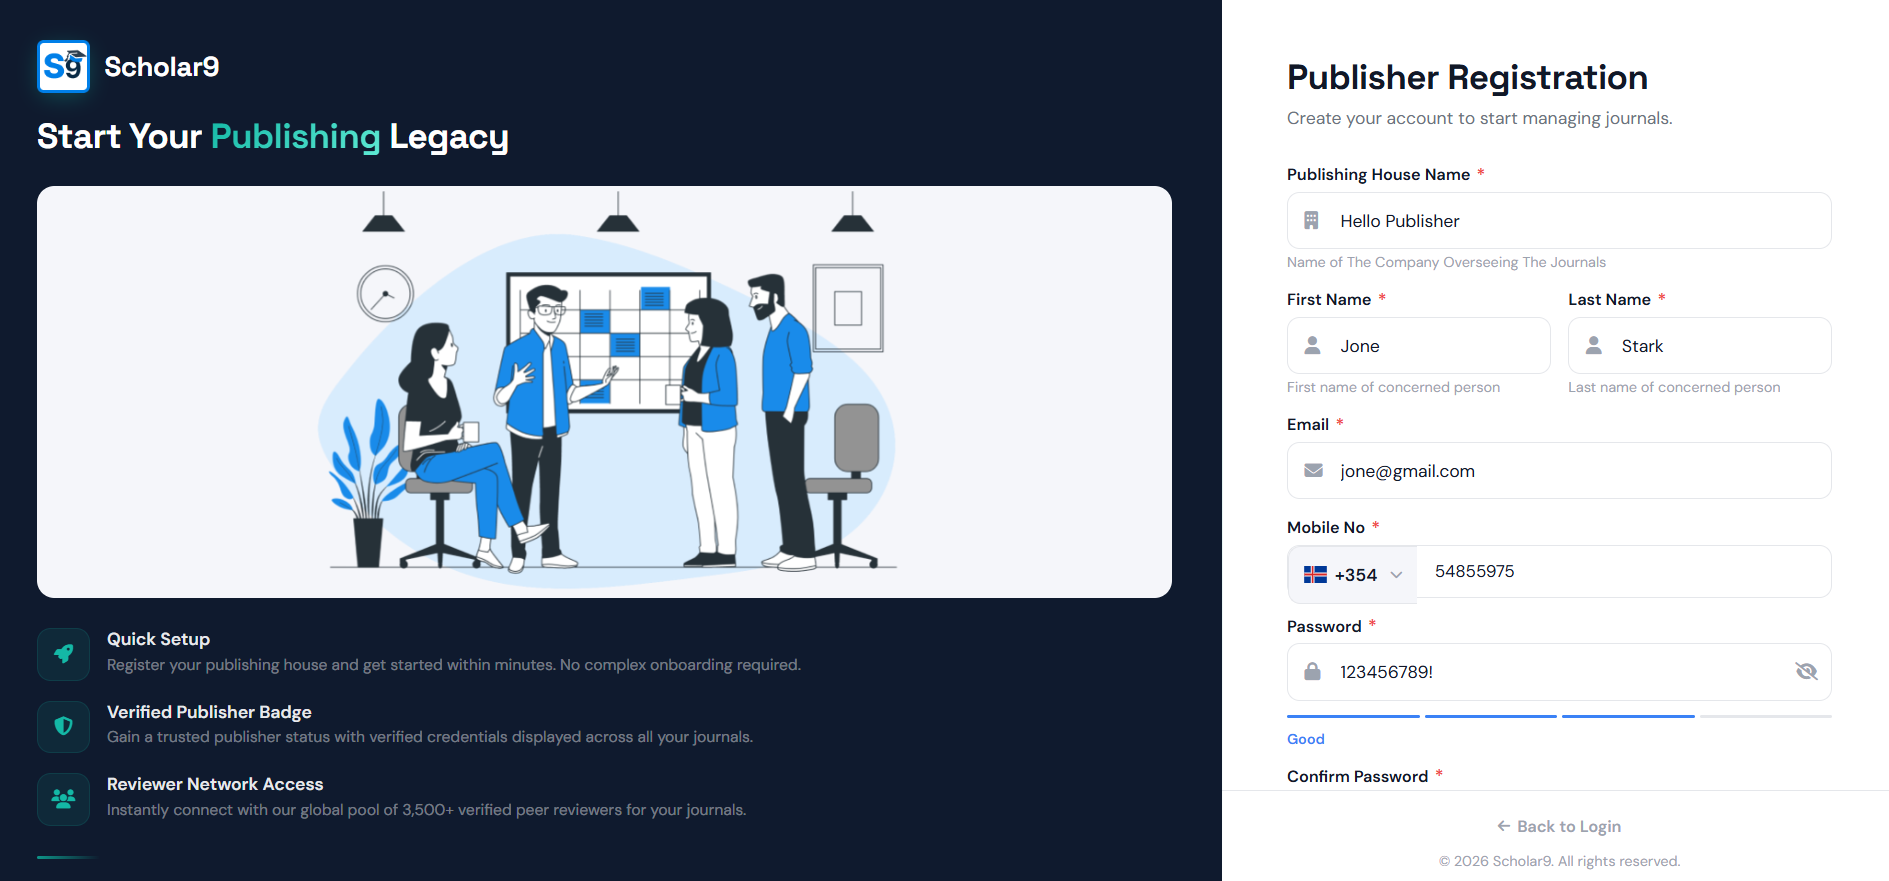
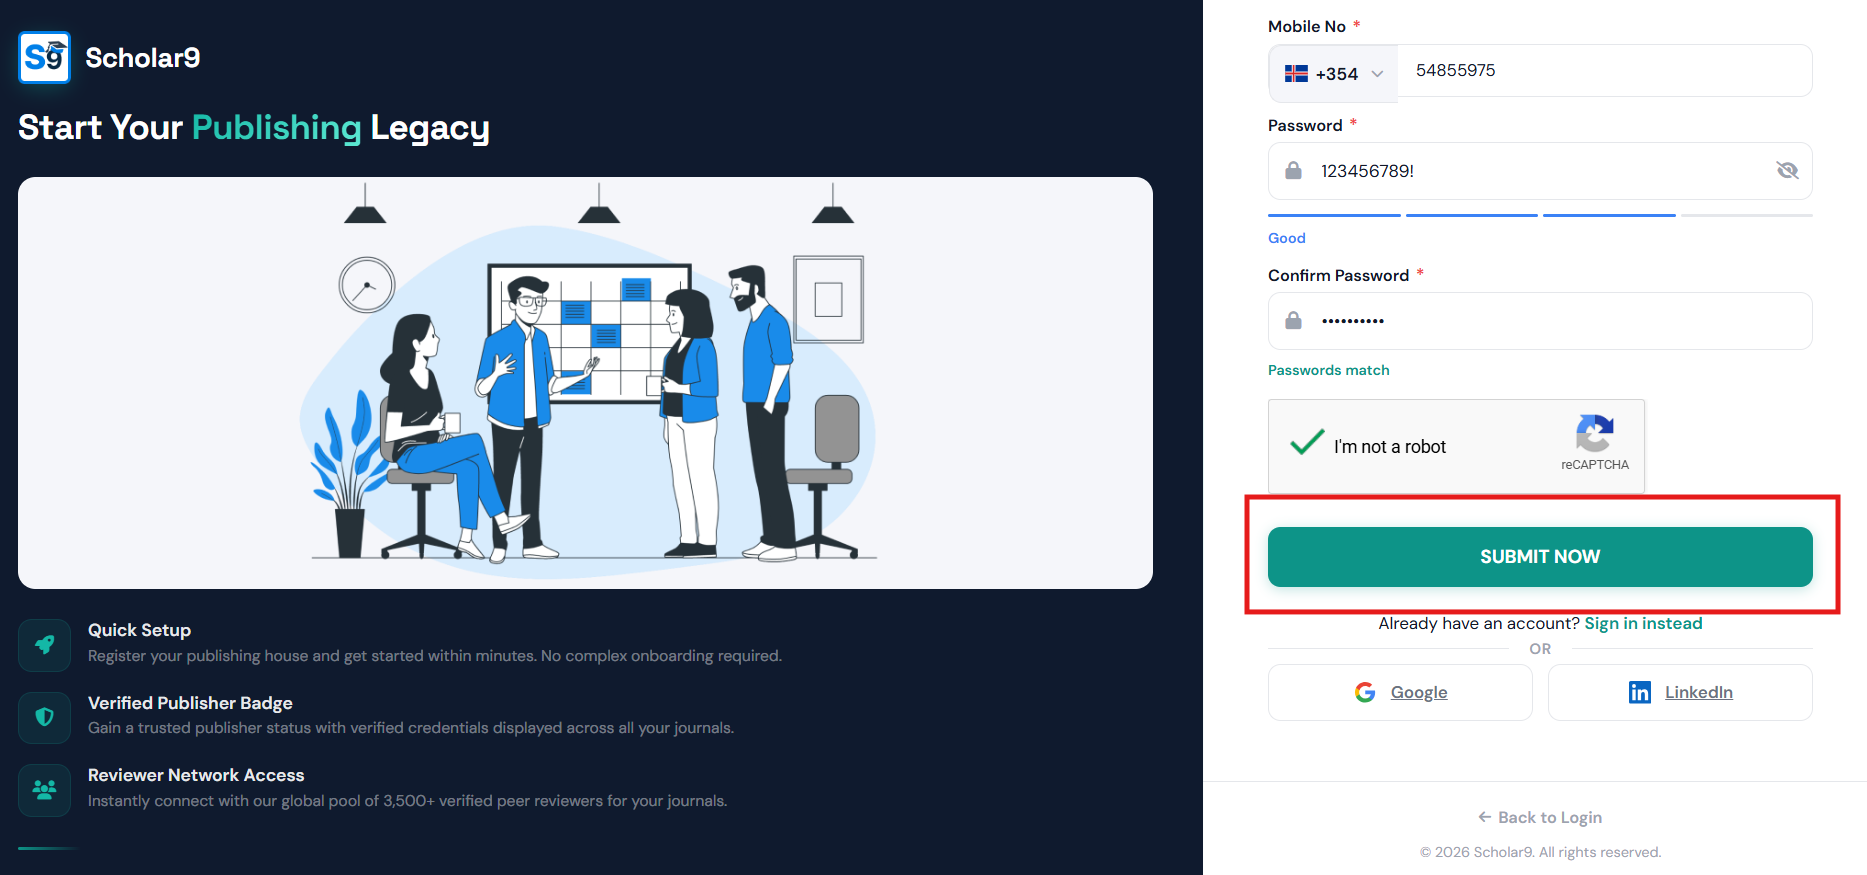
New User — Complete Registration
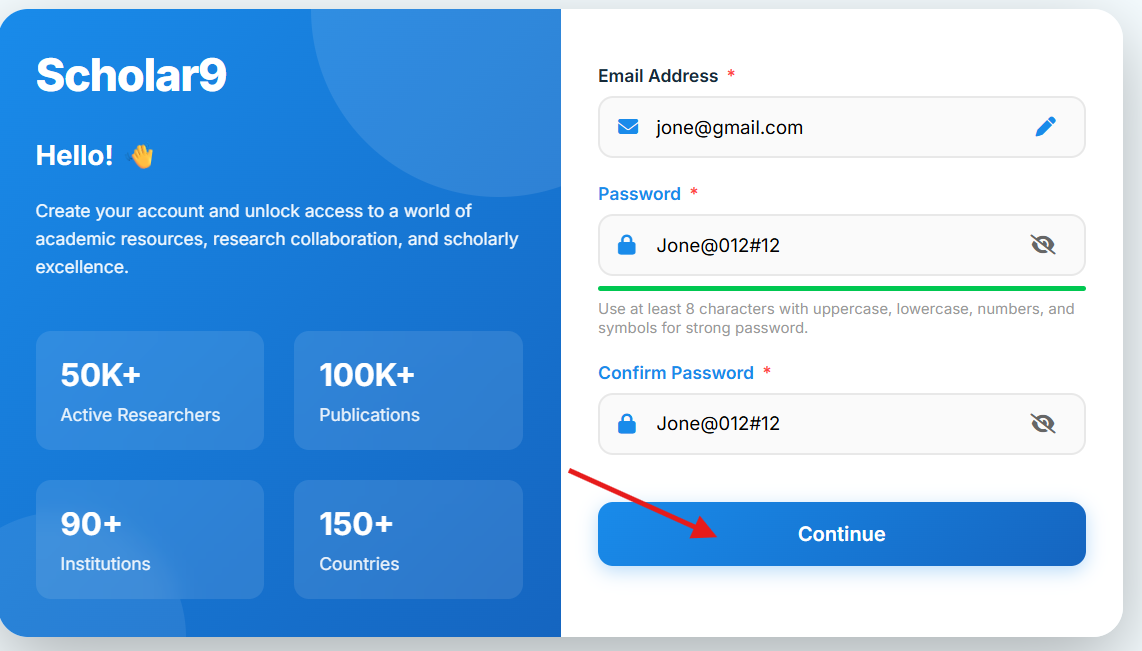
If your email is not in the system, Scholar9 takes you to the registration page. Fill in your basic details — name, password — and submit to create your account. You will receive a verification email to activate your account. If you want to change your email, simply click the edit button (marked with a red box) next to your email address.
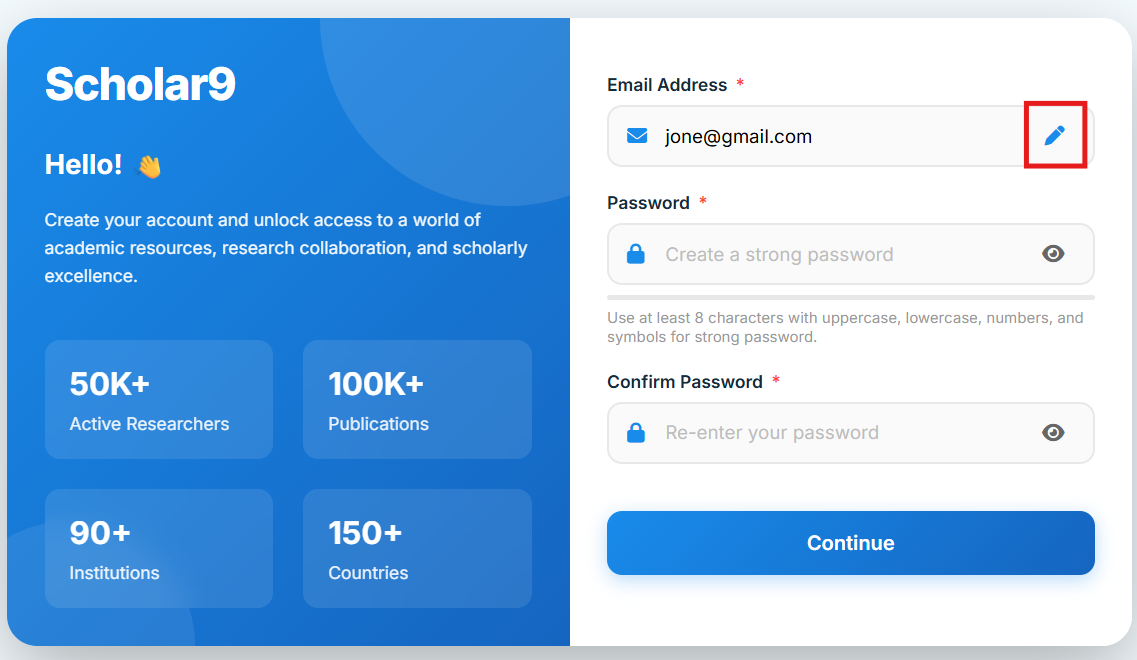
Set a secure password and confirm it. Click the continue arrow button to proceed to the next step.
Finally, provide your personal details including First Name, Last Name, Mobile Number, and accept the Terms & Conditions to complete your registration.
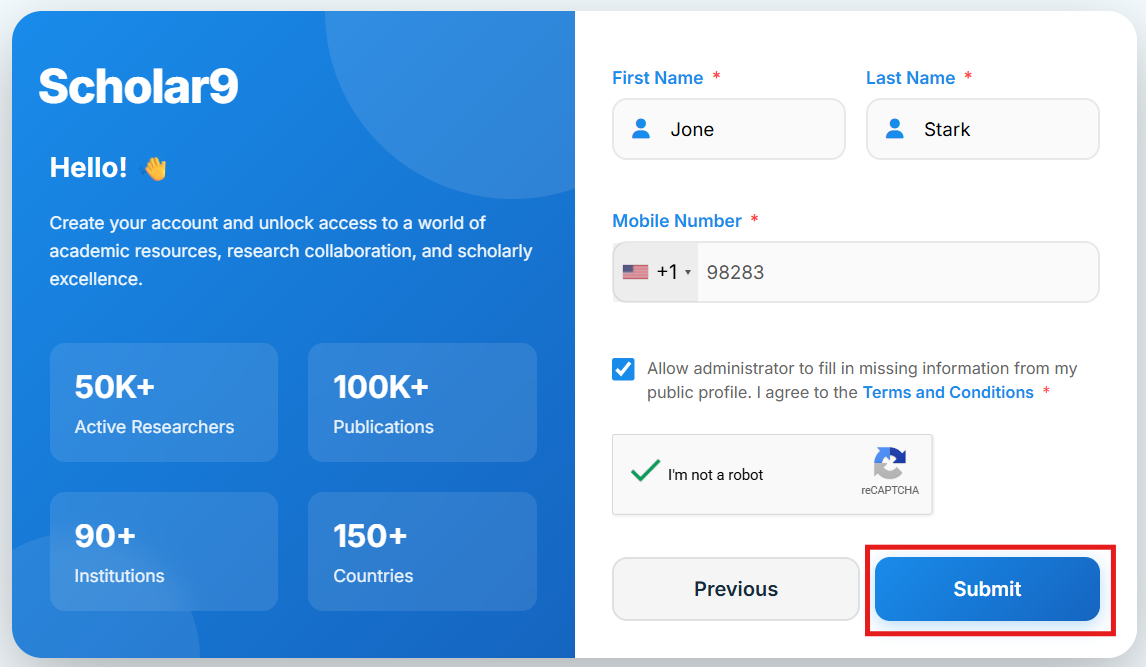

Additional Sign-In Options
- LinkedIn Login: You can sign in directly using your LinkedIn account for faster access — no password required.
- Google Login: Sign in with your Google account for quick, secure access to your Scholar9 profile.
- Wrong Email? On the login screen, click the edit icon next to your email to go back and enter a different email address.
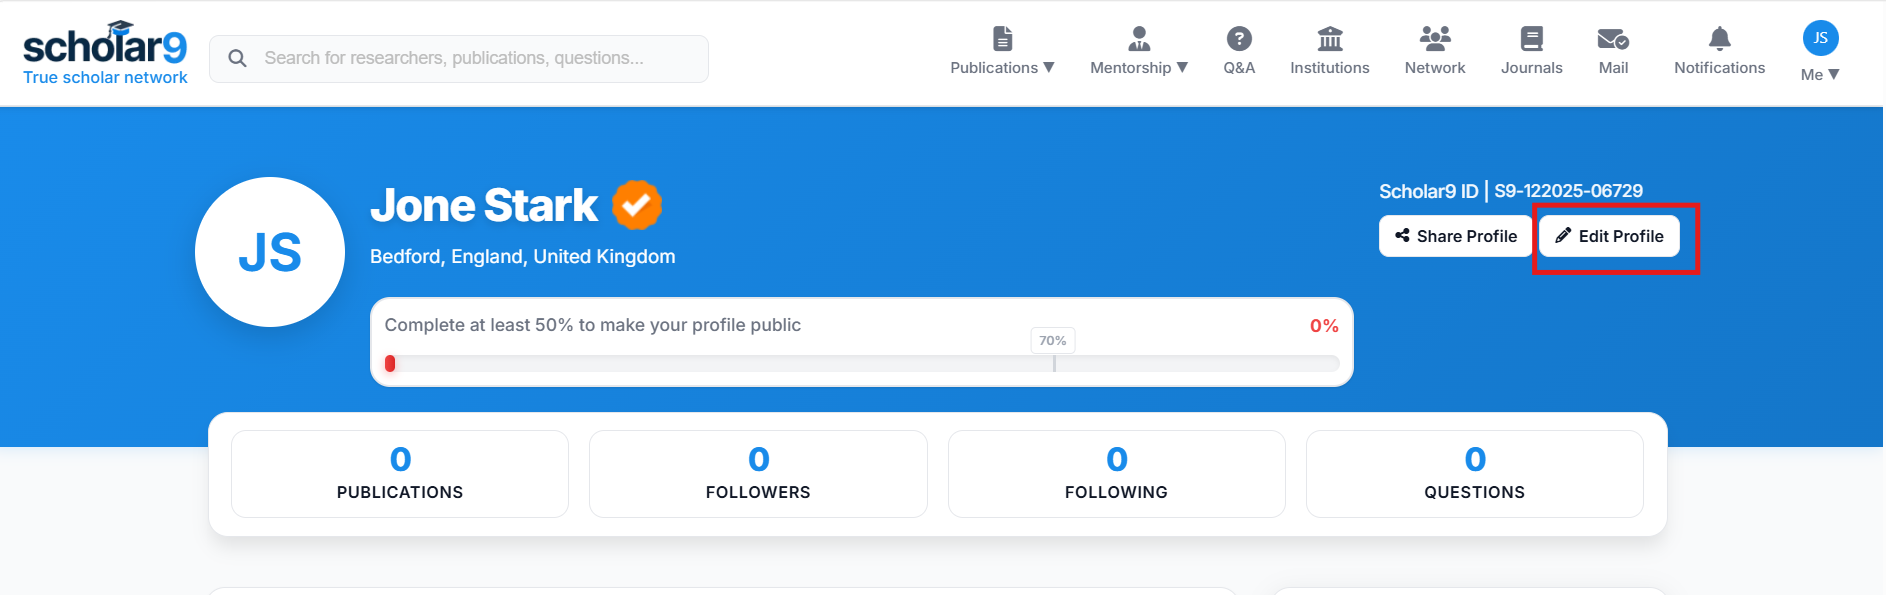
Complete Your Academic Profile
A fully completed profile unlocks the Scholar9 verification badge, boosts your visibility in the research network, and builds trust with collaborators and publishers.
Step 1 — Verify Your Email Address
After registration, Scholar9 sends a verification link to your registered email address. Click the link within 24 hours to activate your account. Unverified accounts have limited access to the platform's features.
How do I verify my account or profile? Note: Clicking this button will also help you to verify your account. To verify your academic profile fully, completing this step is required. If you are wondering "how do I verify my account?", starting with this email verification button is the very first step.

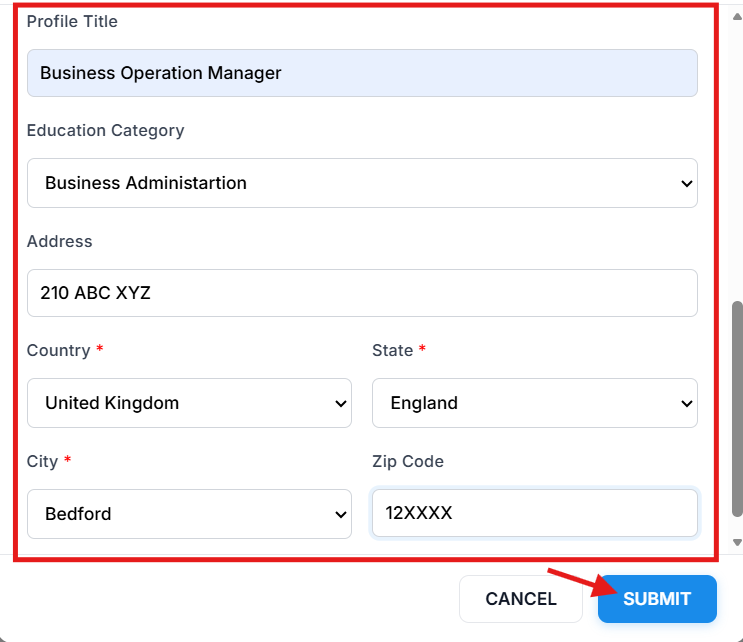
Step 2 — Fill Real Personal & Academic Data
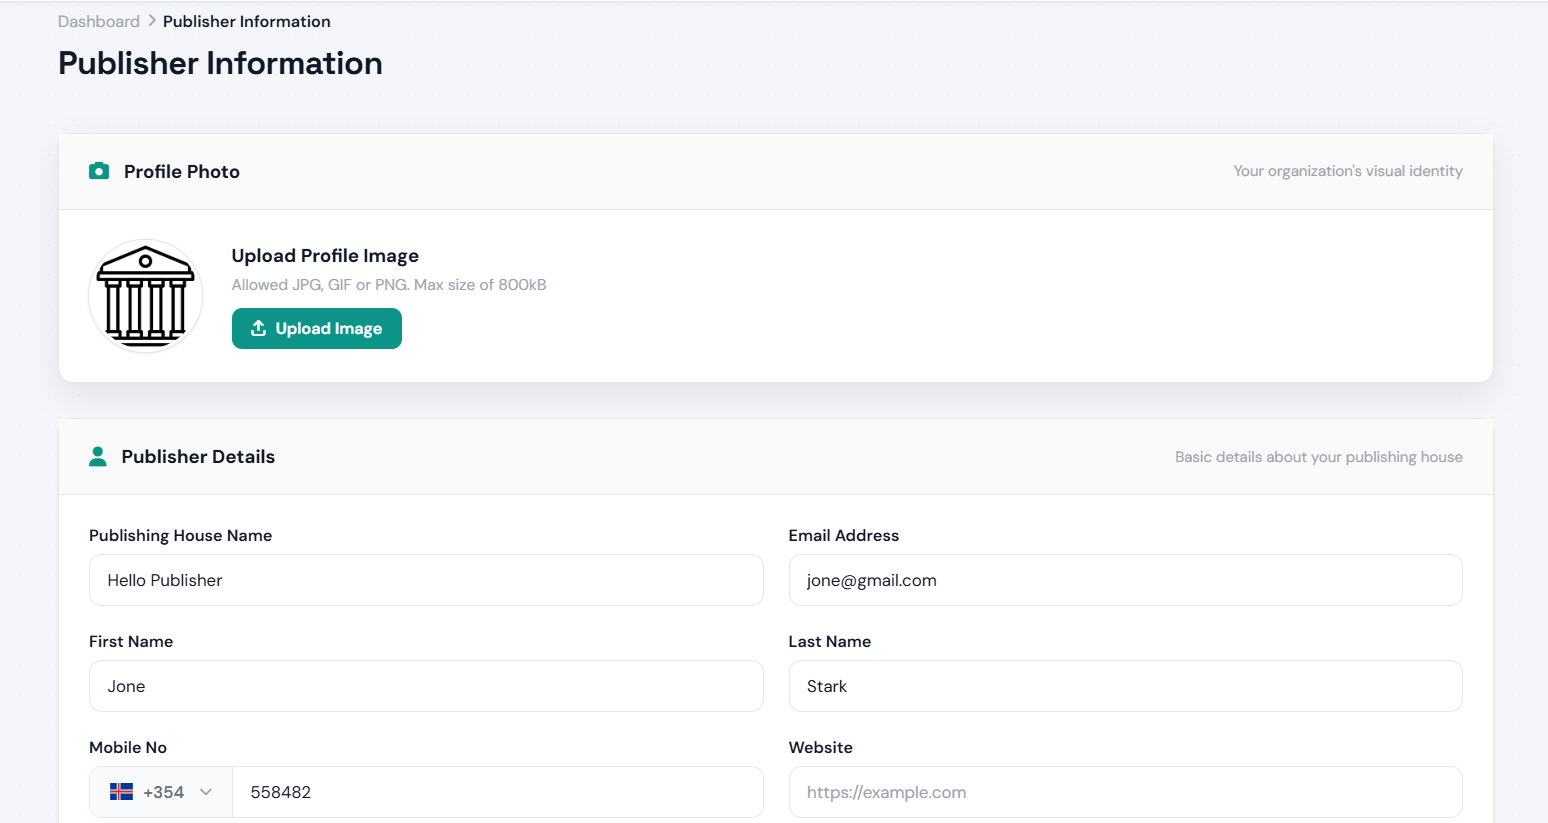
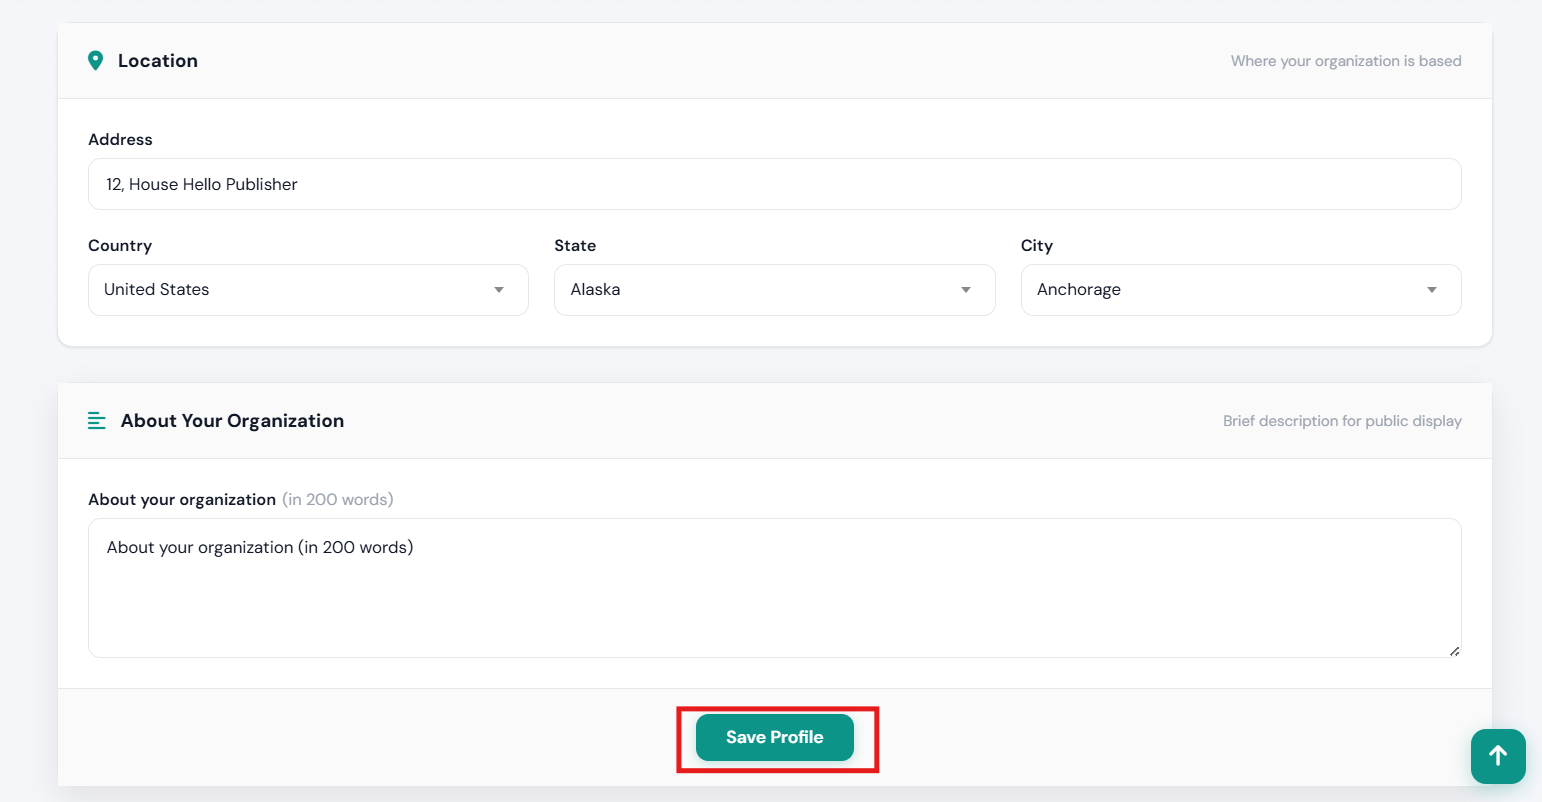
Navigate to My Profile → Edit Profile. Every field you fill contributes to your profile completeness score. Use real, accurate information — Scholar9 cross-references public academic records for verification.
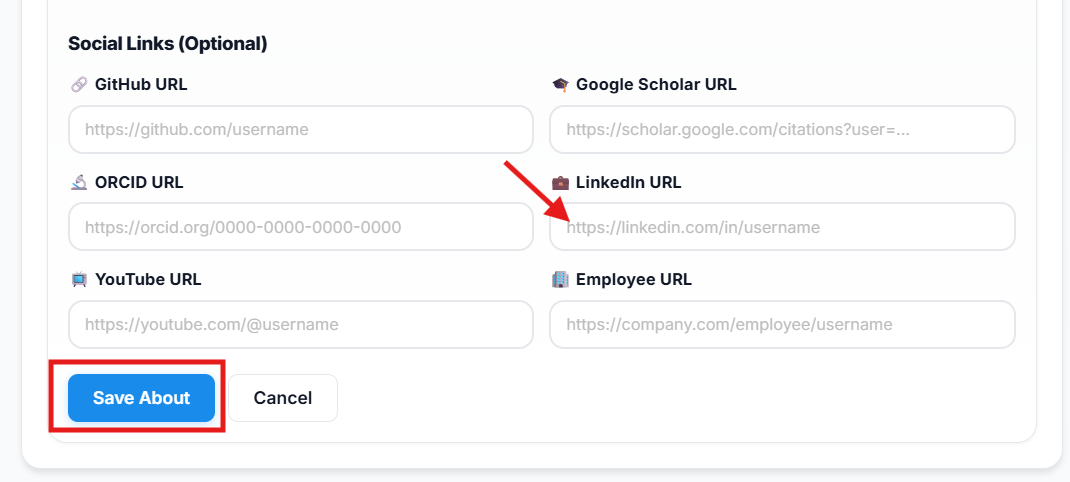
To unlock the Scholar9 Verified Badge ✓ . Click on Verfiy Email Button if not yet vefiyed. And Add you Linkedin Profile url By click on About section -> Add or Edit button.. At here You also link your ORCID,
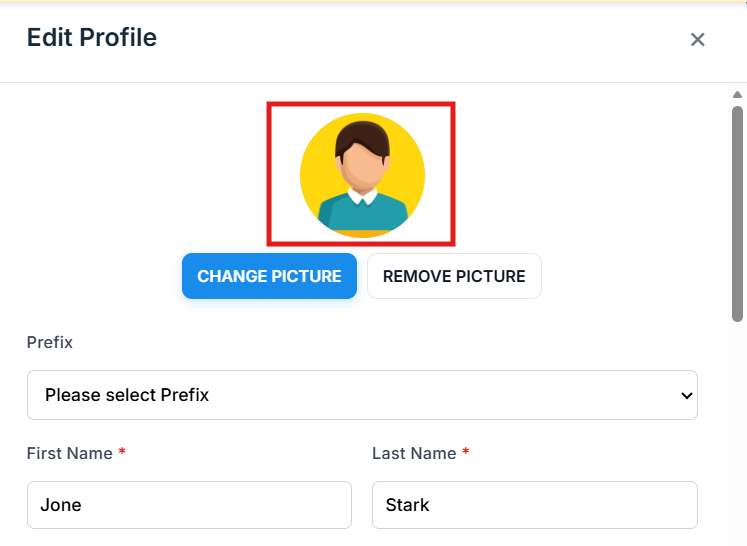
Use your full academic name as it appears on your institution ID. Upload a professional headshot — no logos or group photos.
Step 3 — Connect LinkedIn for the Verification Tick ✓ (Optional)
Adding your LinkedIn profile URL is one of the most impactful steps for earning the Scholar9 Verified Badge.
Go to Profile Page → Click On About Section Edit Icon → Social Links → LinkedIn Profile URL and paste your full LinkedIn link. Ensure your LinkedIn is set to Public visibility.

Profile Completion Checklist
- ✅ Email address verified via activation link
- ✅ Real full name and professional profile photo uploaded
- ✅ Current institution and department selected from dropdown
- ✅ At least one complete education record added
- ✅ Minimum 3 research interest keywords added
- ☑️ ORCID iD linked (orcid.org) — Optional, but strongly recommended
- ✅ At least one publication added (with DOI if available)
- ☑️ LinkedIn profile URL added (public profile) — Optional
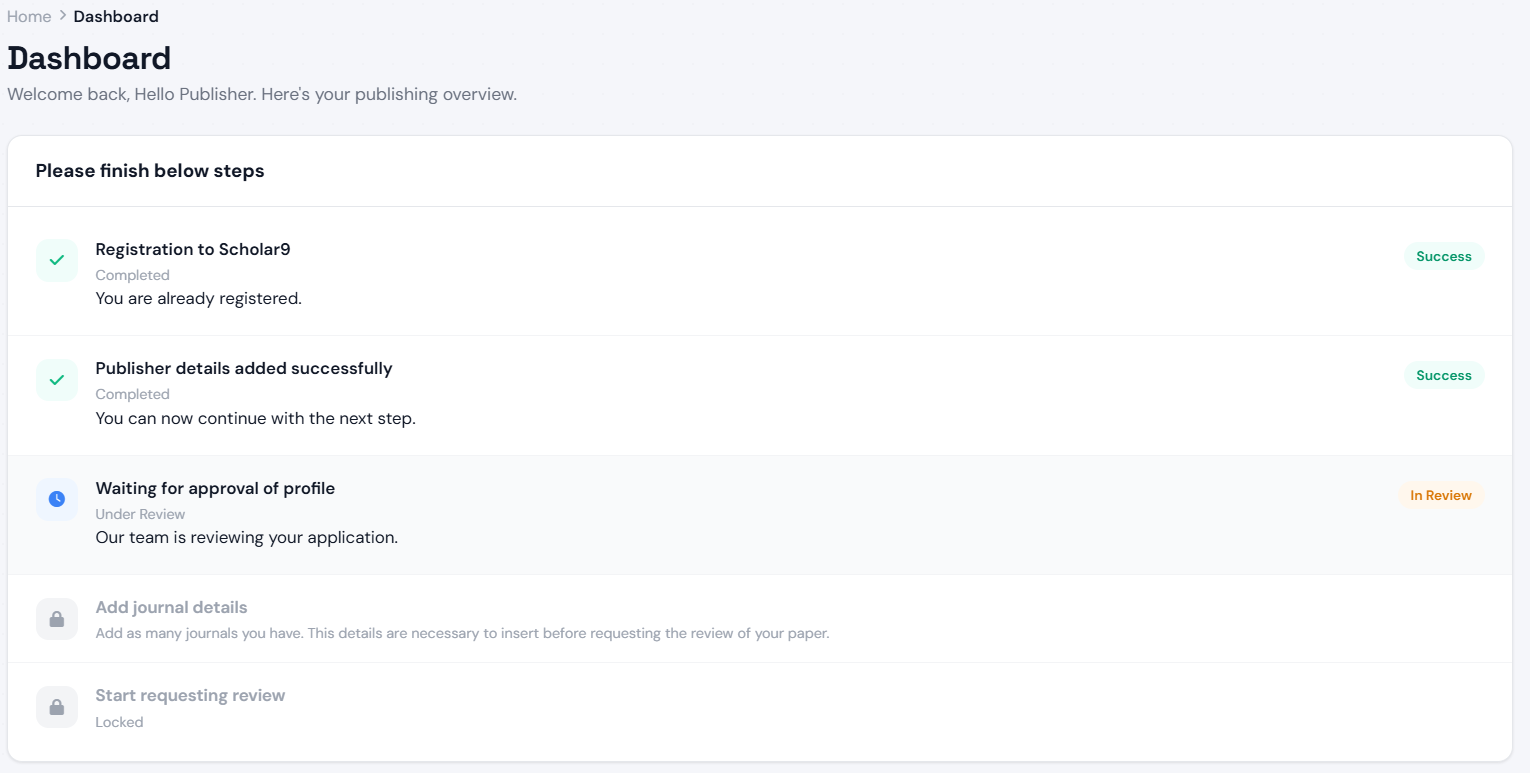
Step 4 — Wait for Verification
Please wait 24-48 hours while our team reviews your profile. If your account is not activated within the given period, you can manually send us an email via the Contact Us page. Or, click on the "Apply for verify" link as shown in the image below.

Scientific Search & Metadata Discovery
Query indexed article banks, lookup double-blind peer-review histories, and track transparent timelines.
Dynamic Filtering Systems
Scholar9 lets you target research publications using advanced filter matrices (e.g. by journal classification, country-wide academic scheme, publication timelines, and author networks).
Double-Blind Tracking Pipelines
To ensure perfect objectivity, accepted papers showcase clear progress chains including exact referee submission times, editor assessment intervals, and DOI issuance dates.
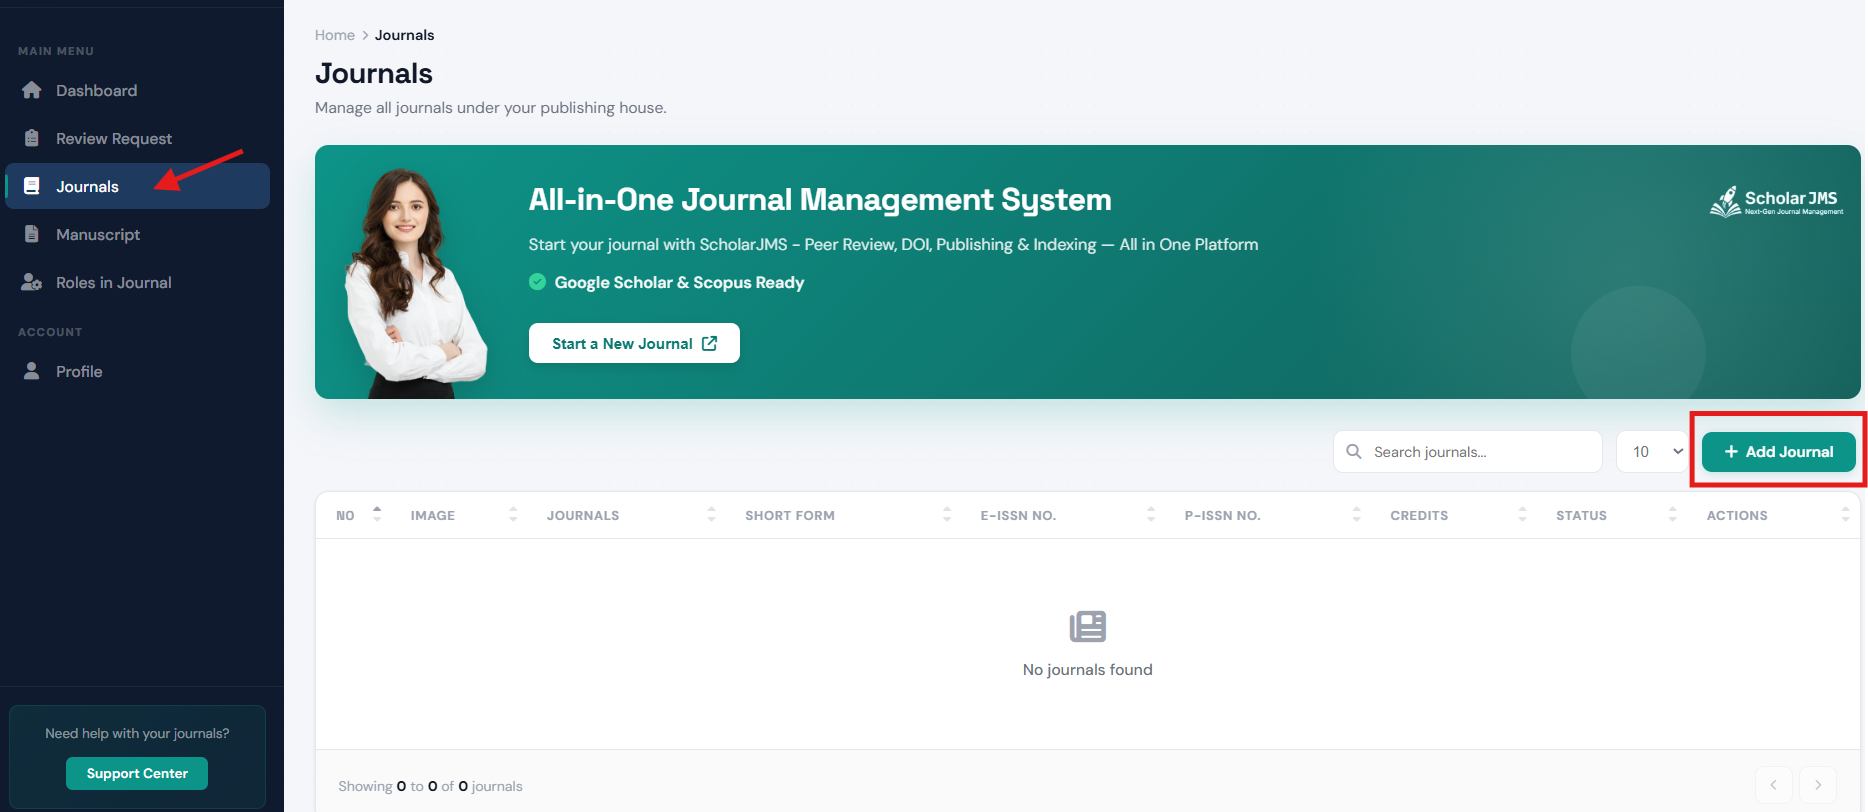
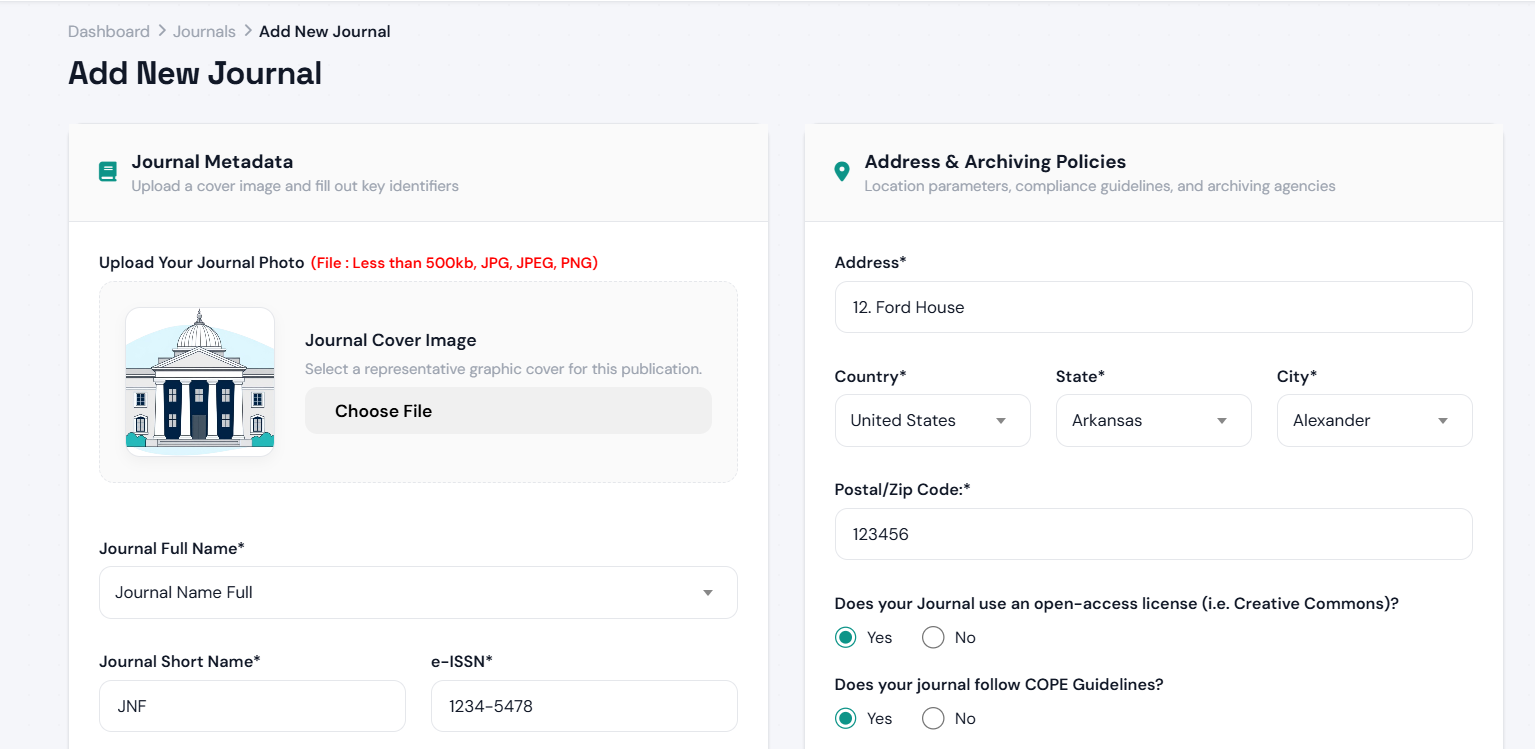
Institution Directory
Find and connect with academic and research institutions globally.
The Institution Directory is a comprehensive list of universities, research centers, and academic bodies. Adding your institution helps properly link your academic profile to your affiliations.
How to add my institution in the institutions list?
Method 1: Contact Us (Recommended)
The most effective and fastest way to get your institution listed is to contact us via the contact page. Our team will verify and add the institution promptly (Business Hours: Monday to Saturday, 10:00 AM to 6:00 PM).
Method 2: Add via Profile Education
You can also request to add an institution while updating your academic profile:
- Go to your profile and edit or add a new Education entry.
- Search for your institute name in the provided field.
- If your institute is not found, you will see an "Add Institution" option. Click on it, and it will get added.
Note: Adding an institution this way will only add its name. To include full details like its photo, address, and other information, please contact us. You can see multiple ways to reach us on the contact page, and we are happy to hear from you!
To prevent spam, any institution added through the profile will be marked as inactive by default. It will not show up on the public institute list page until it goes through manual review. Since this process takes much longer, we highly recommend using Method 1.
Organization Directory
Find and connect with companies, labs, and professional organizations globally.
The Organization Directory is a comprehensive list of companies, research centers, and professional bodies. Adding your organization helps properly link your academic and professional profile to your affiliations.
How to add my organization in the organizations list?
Method 1: Contact Us (Recommended)
The most effective and fastest way to get your organization listed is to contact us via the contact page. Our team will verify and add the organization promptly (Business Hours: Monday to Saturday, 10:00 AM to 6:00 PM).
Method 2: Add via Profile Experience
You can also request to add an organization while updating your professional profile:
- Go to your profile and edit or add a new Experience entry.
- Search for your organization name in the provided field.
- If your organization is not found, you will see an "Add Organization" option. Click on it, and it will get added.
Note: Adding an organization this way will only add its name. To include full details like its photo, address, and other information, please contact us. You can see multiple ways to reach us on the contact page, and we are happy to hear from you!
To prevent spam, any organization added through the profile will be marked as inactive by default. It will not show up on the public organization list page until it goes through manual review. Since this process takes much longer, we highly recommend using Method 1.
Academic Feed & Research Posts
Share your research milestones, discoveries, and academic updates with the Scholar9 global research community.
What is the Scholar9 Feed?
The Scholar9 Feed is your academic social timeline. Think of it as a focused research network — built exclusively for academics and researchers worldwide. Here you can post updates, share papers, comment on colleagues' work, and stay informed about what's happening in your research field.
What You Can Post
- Standard Posts (Text & Photos): Share text updates, research progress, and attach images to keep your network informed about your work.
- Academic Polls: Gather opinions and feedback from the community by creating interactive polls. You can allow single or multiple answers and set custom expiration durations.
- Celebrations & Milestones: Use specialized celebration templates to announce a Project Launch, Work Anniversary, New Position, Educational Milestone, or a new Certification.
- Publications: Share your published papers. The feed integrates directly with the Article Deposit system to showcase your scholarly output.
- Questions & Discussions: The 'Question' option routes you directly to the dedicated Q&A forum where you can ask detailed research questions.
- Auto-Generated Achievements: When you add new certificates, awards, or experiences to your profile, the system can automatically generate celebratory milestone posts for your network.
Advantages of Creating Posts
Actively participating in the Scholar9 feed provides significant benefits to your academic career:
- Global Visibility: Showcase your research, papers, and milestones to a targeted, worldwide audience of verified researchers and institutions.
- Collaboration Opportunities: By sharing your ongoing projects and asking questions, you naturally attract potential co-authors, peer reviewers, and project collaborators.
- Instant Feedback: Use the Academic Polls feature to rapidly gather structured opinions from qualified peers on research methodologies or topics.
- Automated Portfolio Building: Utilizing Auto-Generated Achievements ensures your followers are instantly notified when your academic profile (certifications, awards, publications) is upgraded, requiring zero manual effort.
- Privacy-First Networking: Build a robust academic presence and interact with senior scholars without needing to expose private contact information.
- Community Engagement: Foster meaningful discussions with peers and subject matter experts in your field by sharing insights that invite constructive dialogue.
How to Create Your First Post
First, ensure you are logged into your Scholar9 account. Upon logging in, you will be directed to the Feed page automatically.
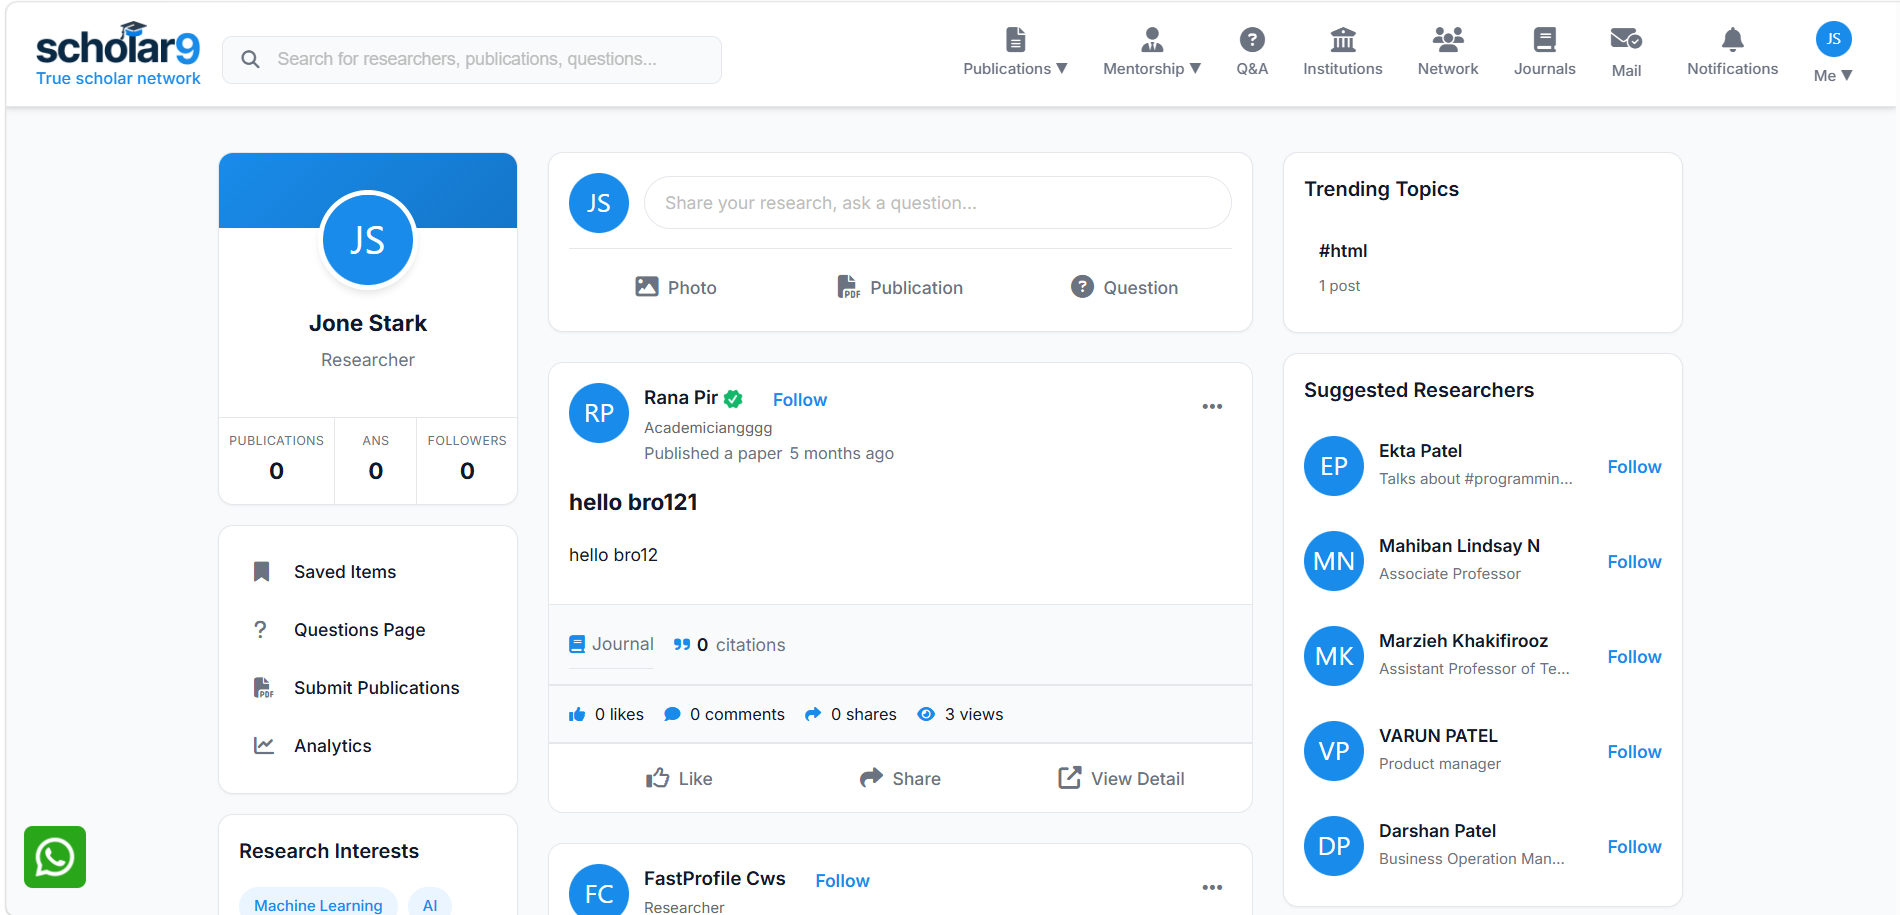
If you are currently exploring other areas of the platform (like your Profile or Q&A), you can always return to the Feed instantly by clicking the Scholar9 logo in the top navigation bar.

At the top of the feed, click on the "Share your research, ask a question..." input field.
In the popup, write your post content. You can share updates about your publications or ongoing research. You can dynamically tag colleagues by typing @ followed by their name. Additionally, use #tags (e.g., #machinelearning, #phdlife, #clinicaltrials) to categorize your post. Tags are highly recommended as they help route your post to other researchers interested in those specific topics.
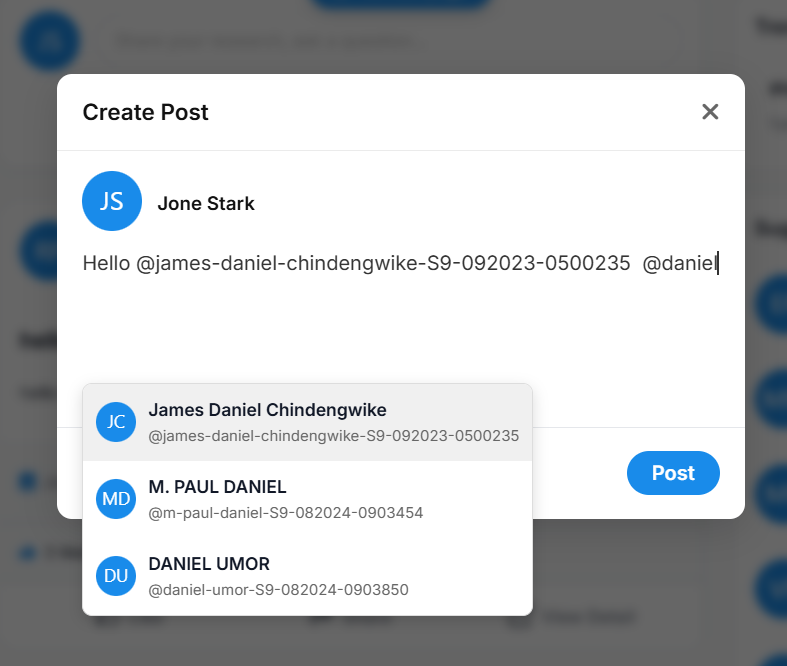
Once your content is ready, simply click the blue Post button in the bottom right corner to instantly publish it to the global feed.

Tracking Post Performance (Analytics)
What is the Analytics Dashboard?
Scholar9 provides a dedicated analytics dashboard designed to help you monitor exactly how your posts are performing across the academic network. It gives you a bird's-eye view of your reach, engagement, and audience interaction over time.
What You Can Do Here
Beyond simply viewing statistics, the dashboard allows you to manage the lifecycle of your posts. From here you can:
- Analyze Performance: Track views, likes, shares, and detailed poll results.
- Delete Posts: Permanently remove a post from the platform if it is no longer relevant.
- Make Posts Inactive (Archive): Change a post's status to inactive so that only you can see it, hiding it from the public feed while preserving your data.
Navigate to your post analytics by clicking on the Analytics menu item in your sidebar.
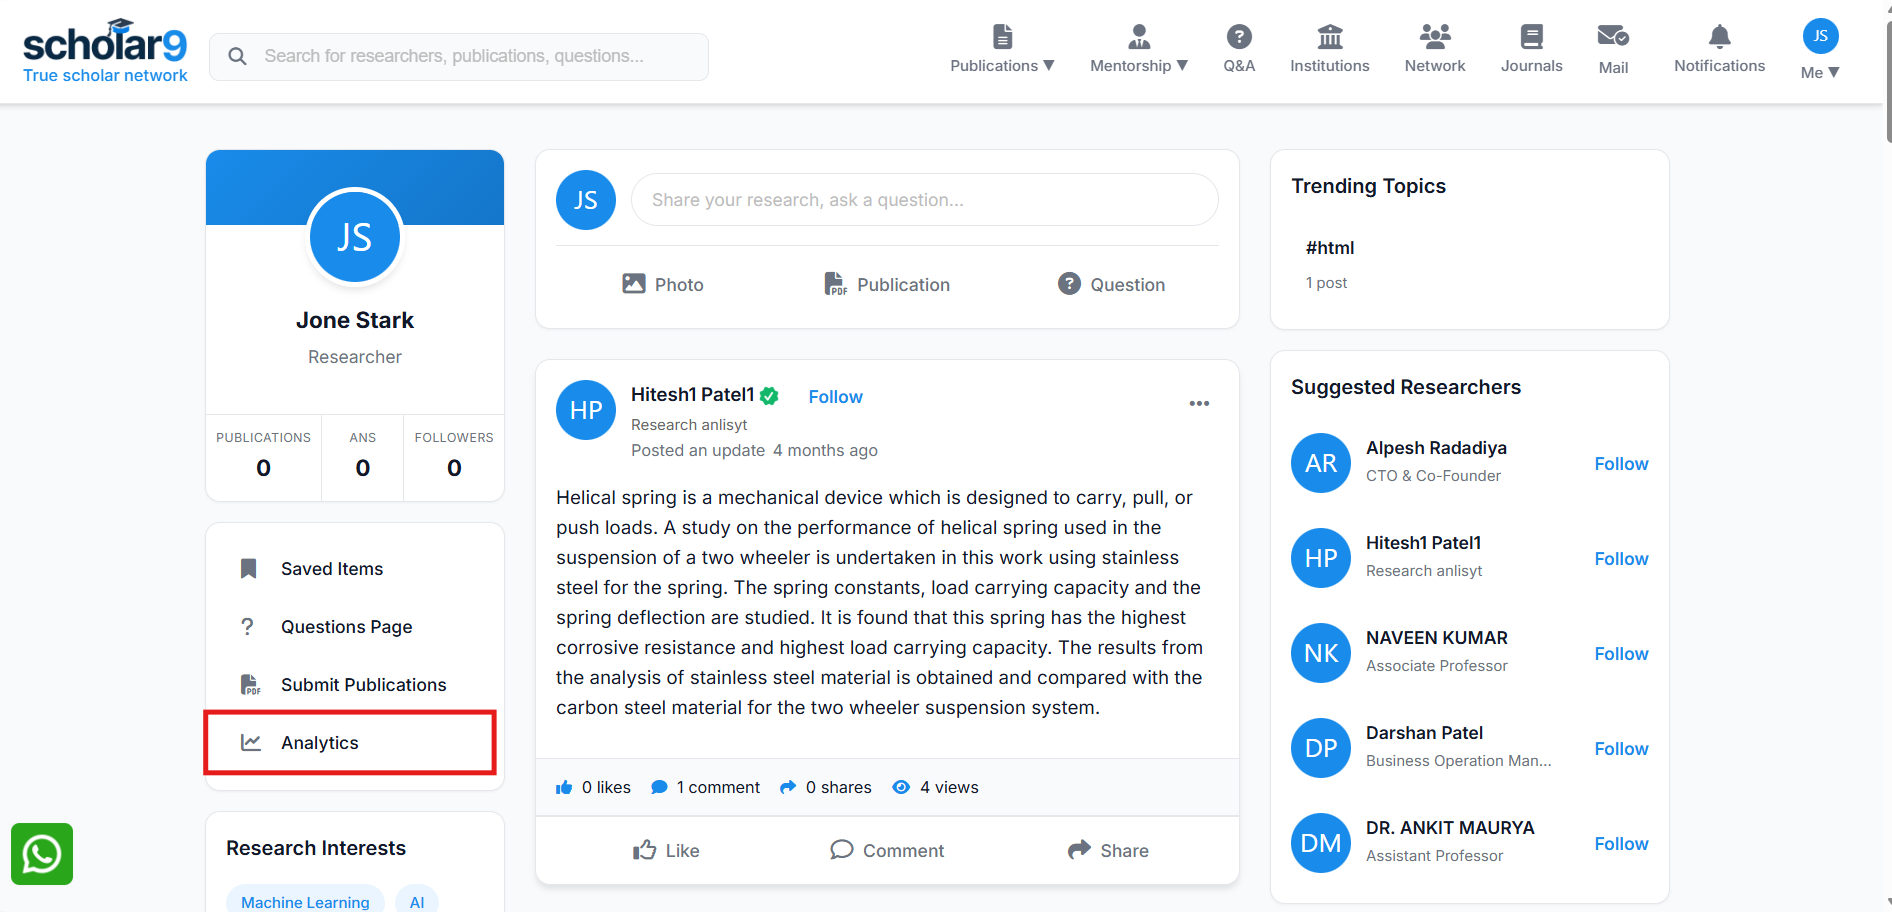
The Analytics page provides comprehensive data on your engagement. Here you can:
- View Overall Stats: See total views, likes, and interactions across all your content.
- Filter by Date & Type: Filter your analytics by specific date ranges or post types (e.g., Polls Only, Celebrations).
- Search Posts: Quickly find a specific post to see its individual performance.
- Poll Insights: Access detailed analytics for any polls you have conducted to see exactly how the community voted.

Engaging with the Community
The feed is interactive — you can like, comment, and share posts from other researchers. Your engagement is visible to your network and helps build your presence in the global academic community.
Interactive Q&A Community Forums
Participate in collaborative peer review discussions. Ask complex research questions, vote on methodology correctness, and organize global knowledge.
What is the Q&A Forum?
The Scholar9 Q&A Forum is a dedicated space for academic inquiry and problem-solving. Unlike standard social feeds, the Q&A section is structured to surface the best, most scientifically accurate answers through community peer review and reputation mechanics.
Asking a Question
When you encounter a research hurdle, you can query the global community:
- Rich Descriptions: Clearly introduce your problem. You can attach thumbnails, documents, and format your text to ensure clarity.
- Skill Tags: Tag your question with specific fields (e.g., #Bioinformatics, #MachineLearning). This instantly routes your question to experts with matching skills.
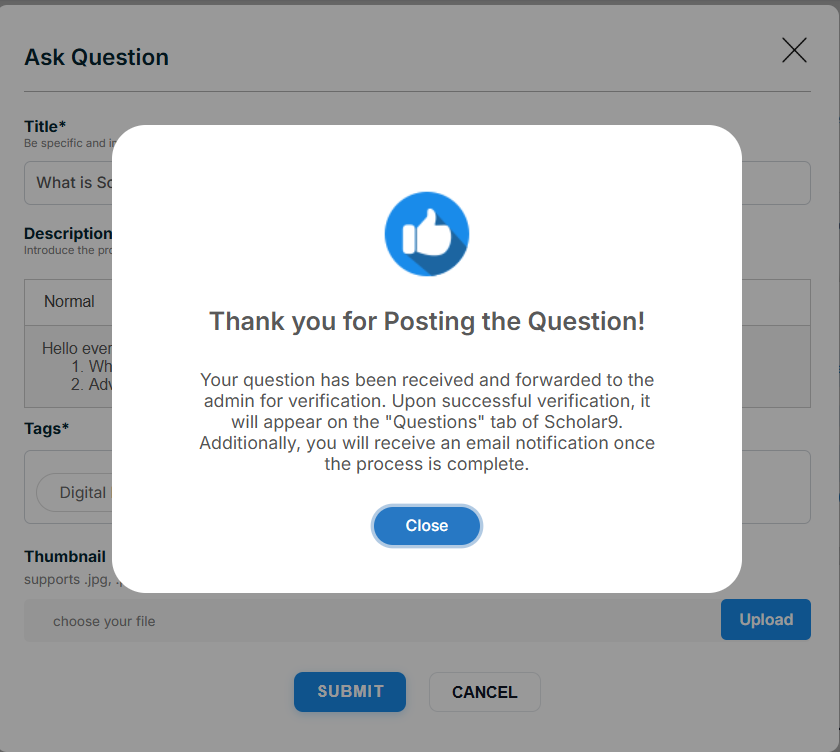
- Quality Moderation: To maintain high academic standards, all new questions undergo a brief verification process before they go live and notify your followers.
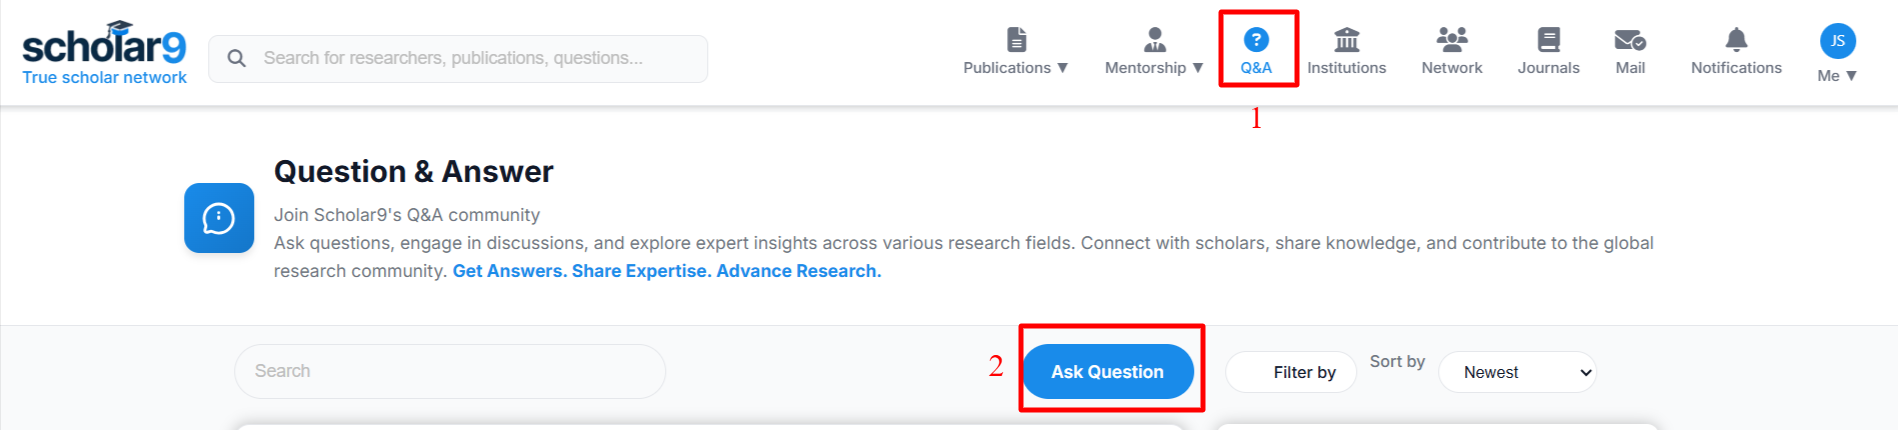
How to Ask a Question
Click on Q&A from the top header navigation. This will take you to the main Questions list. From there, click the Ask Question button.
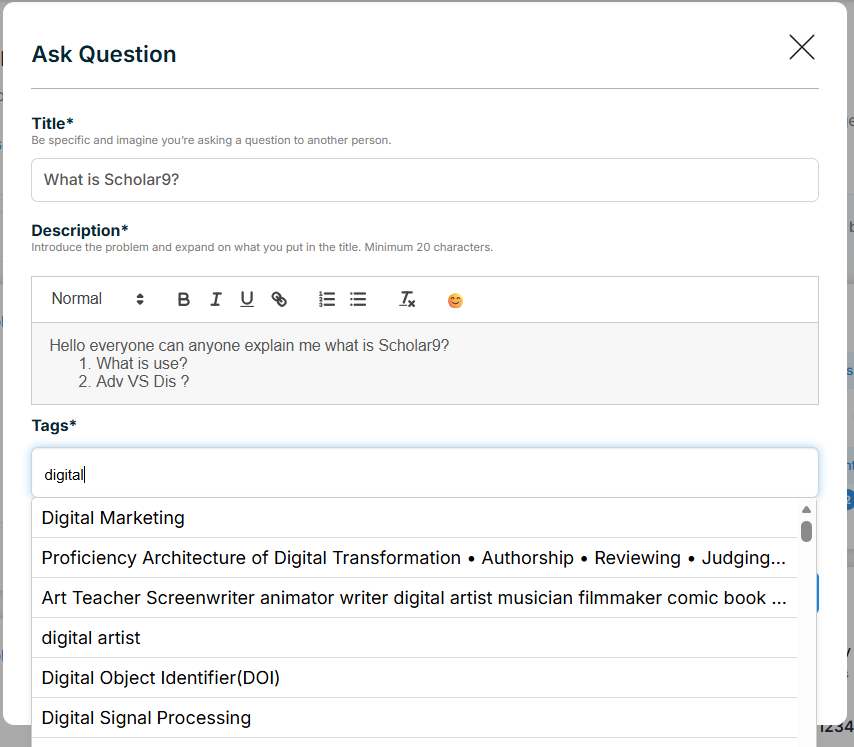
A popup will appear where you can construct your question. Fill in the following details:
- 1. Title*: Be specific and summarize your problem.
- 2. Description*: Provide the full context, background, and any code or equations.
- 3. Tags*: Start typing to see a list of relevant tags. If your tag isn't there, type it and press Enter.
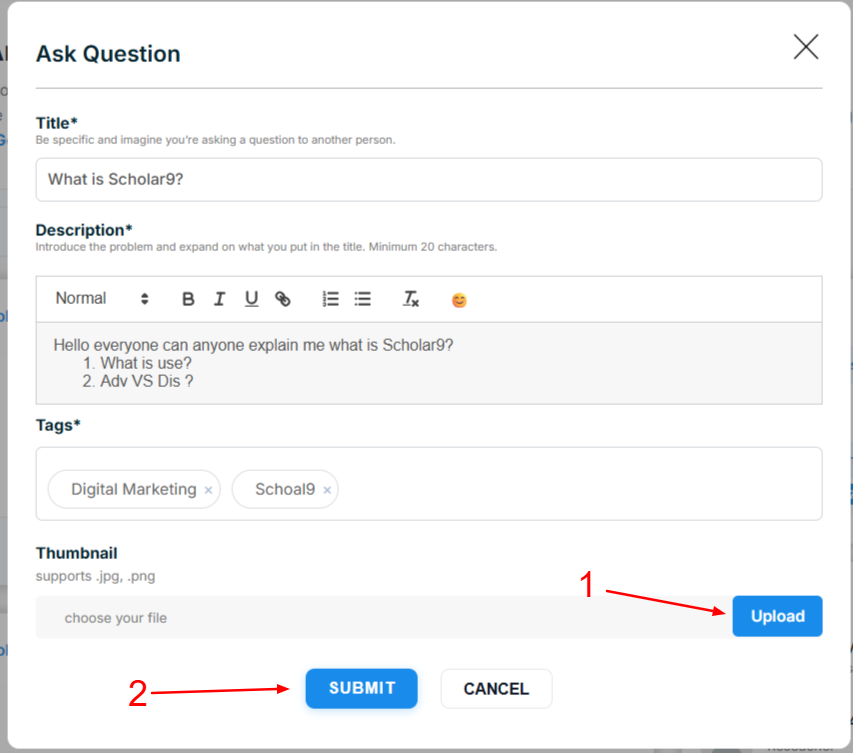
- 4. Thumbnail (Optional): Upload an image if it helps explain your issue.
Review your information and click the Submit button at the bottom of the form.
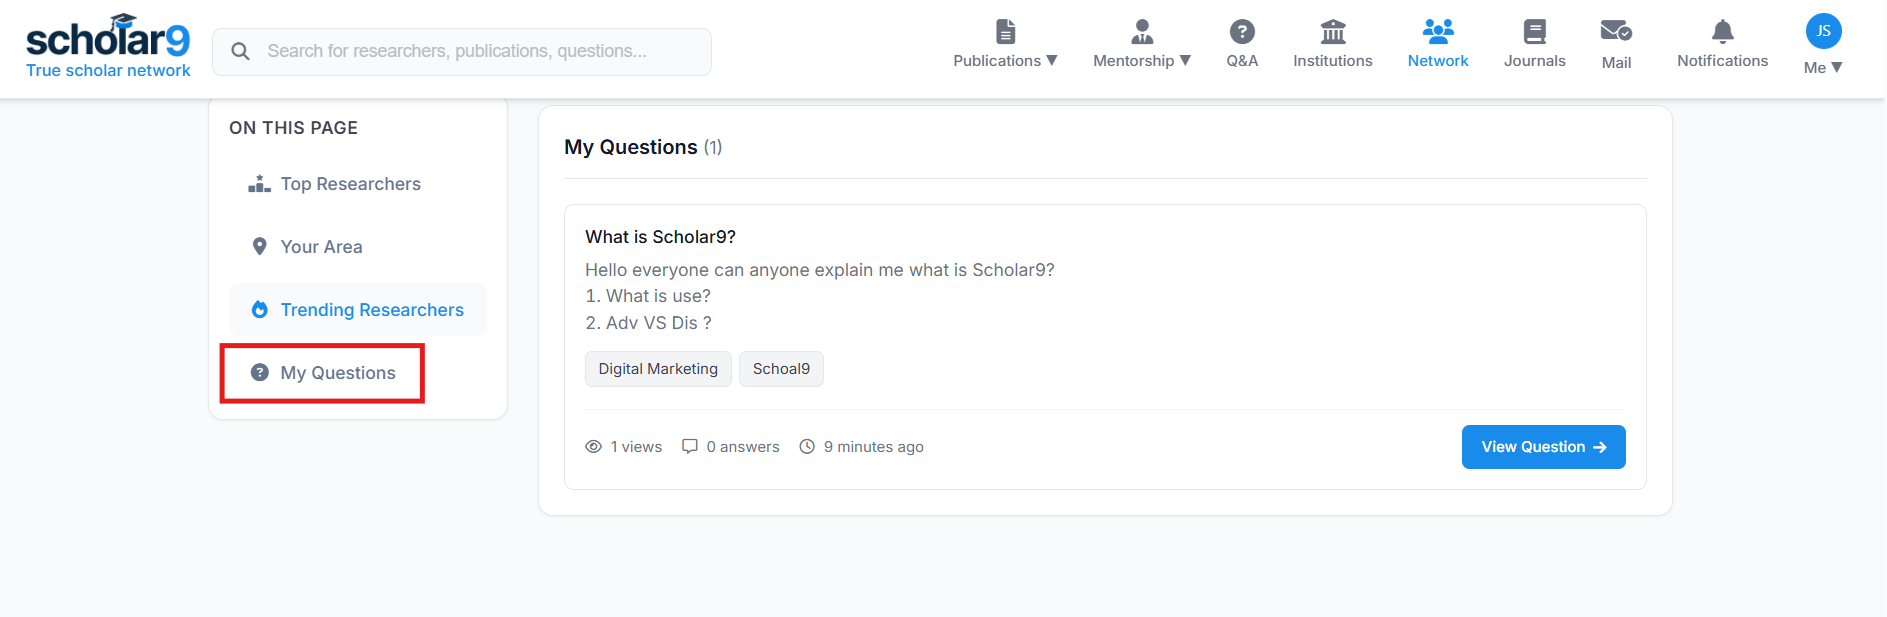
How to View Your Asked Questions
To view all the questions you have asked, navigate to the Network page. Here you will see a list of your submitted questions.
Click the View Question button to see the full details of your question, including its current approval status and any community answers it has received.
Engaging and Finding Answers
The forum provides advanced tools to help you find precisely what you are looking for:
- Advanced Filtering: Sort questions by Newest, Most Active, or Unanswered. You can also filter specifically for questions that match your personal skill set or skills you follow.
- Voting System (Upvote/Downvote): The community acts as peer reviewers. Highly upvoted answers rise to the top, ensuring that the most accurate and helpful responses are always visible first.
- Save & Follow: Save crucial questions to your private library for later reference, or 'Follow' a question to get notified whenever a new answer is posted.
- Knowledge Sharing: Easily share insightful questions externally or copy direct links to collaborate with your university peers.
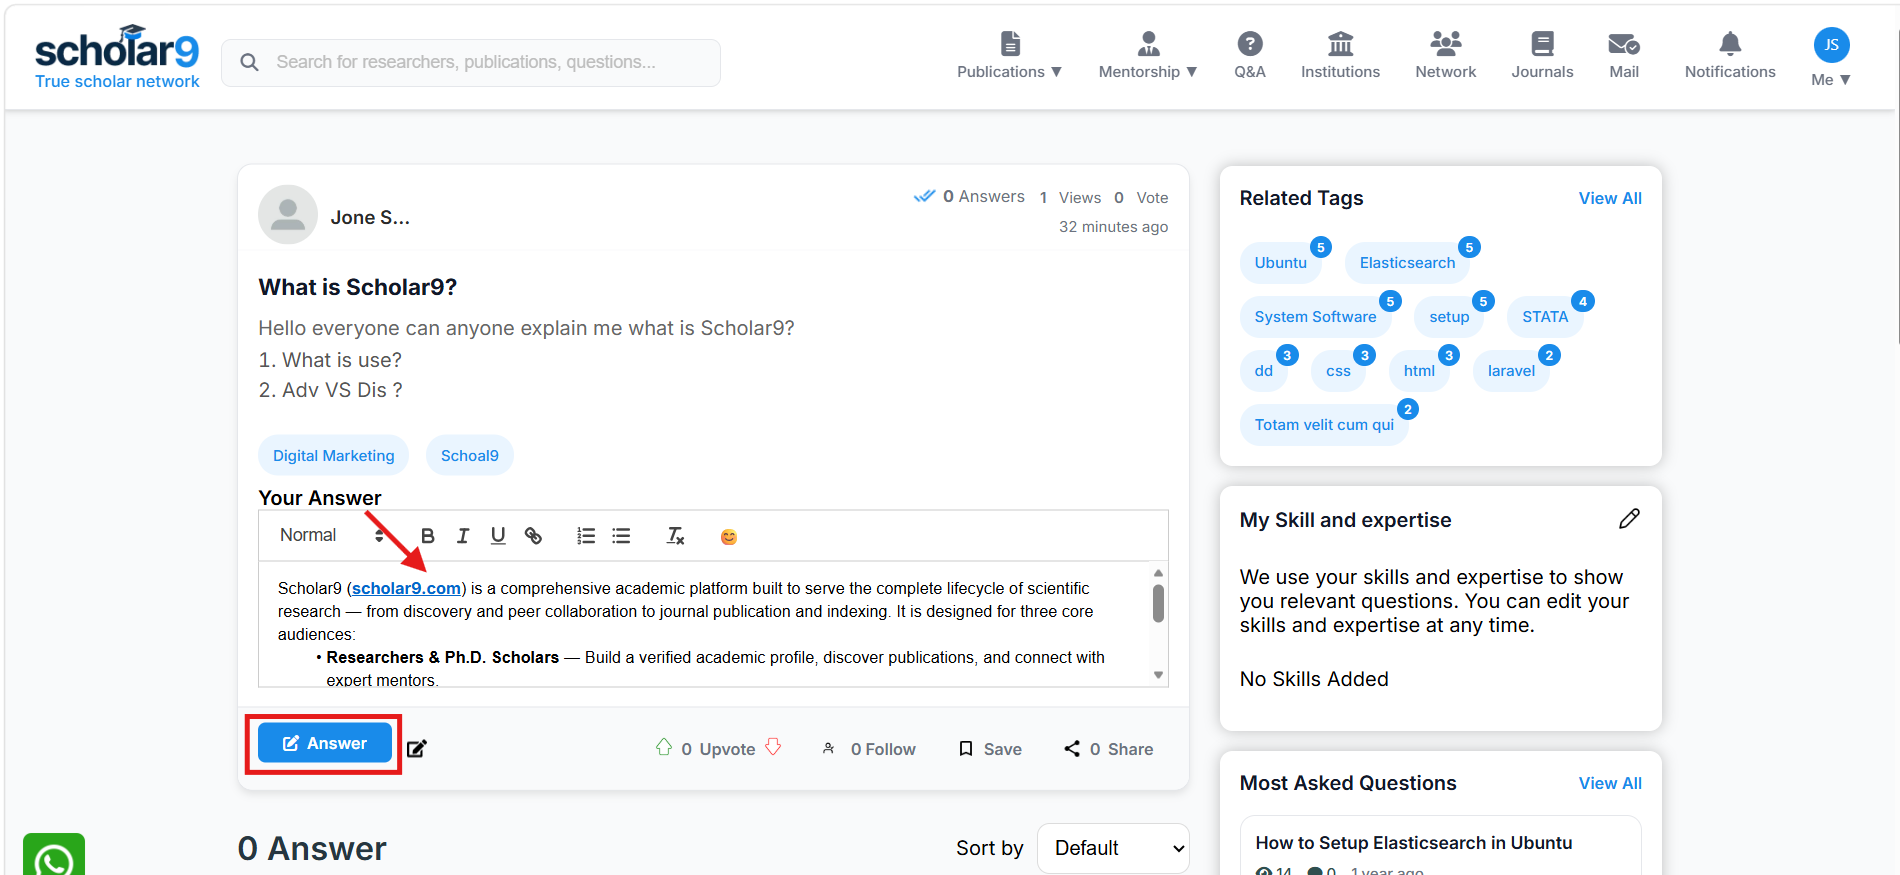
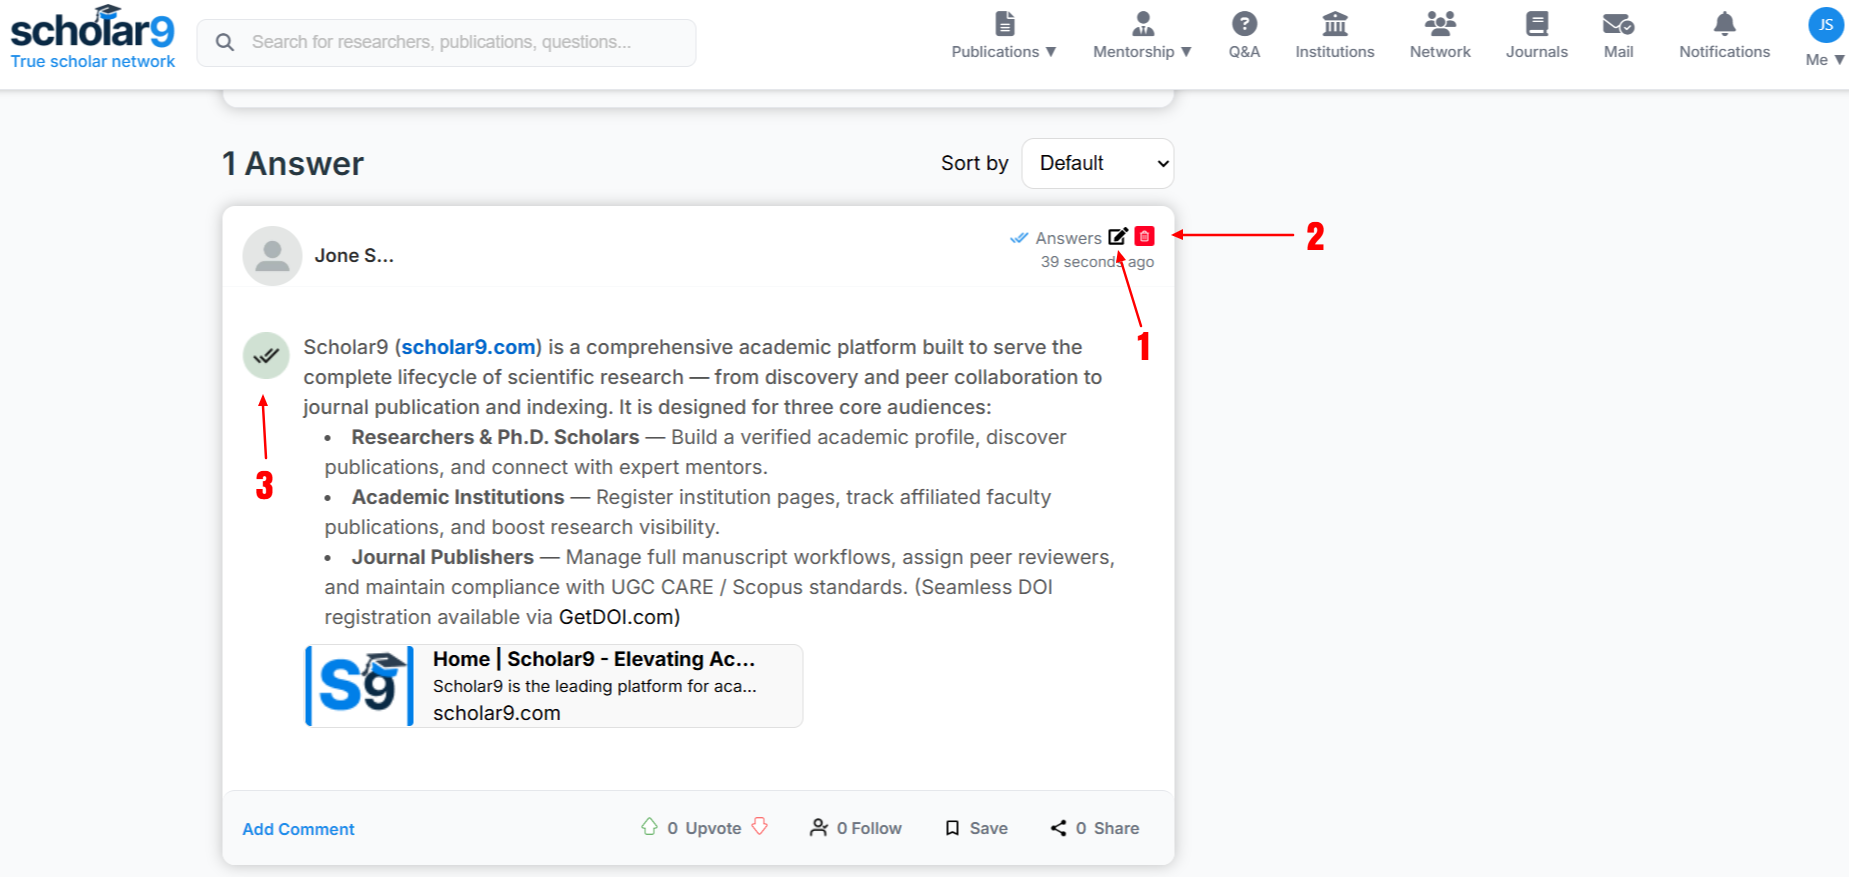
How to Answer a Question
From the questions list, click on the Answer button to open the Question Details page. In the rich text editor provided, write out your detailed answer and click the Answer button below the box to submit.
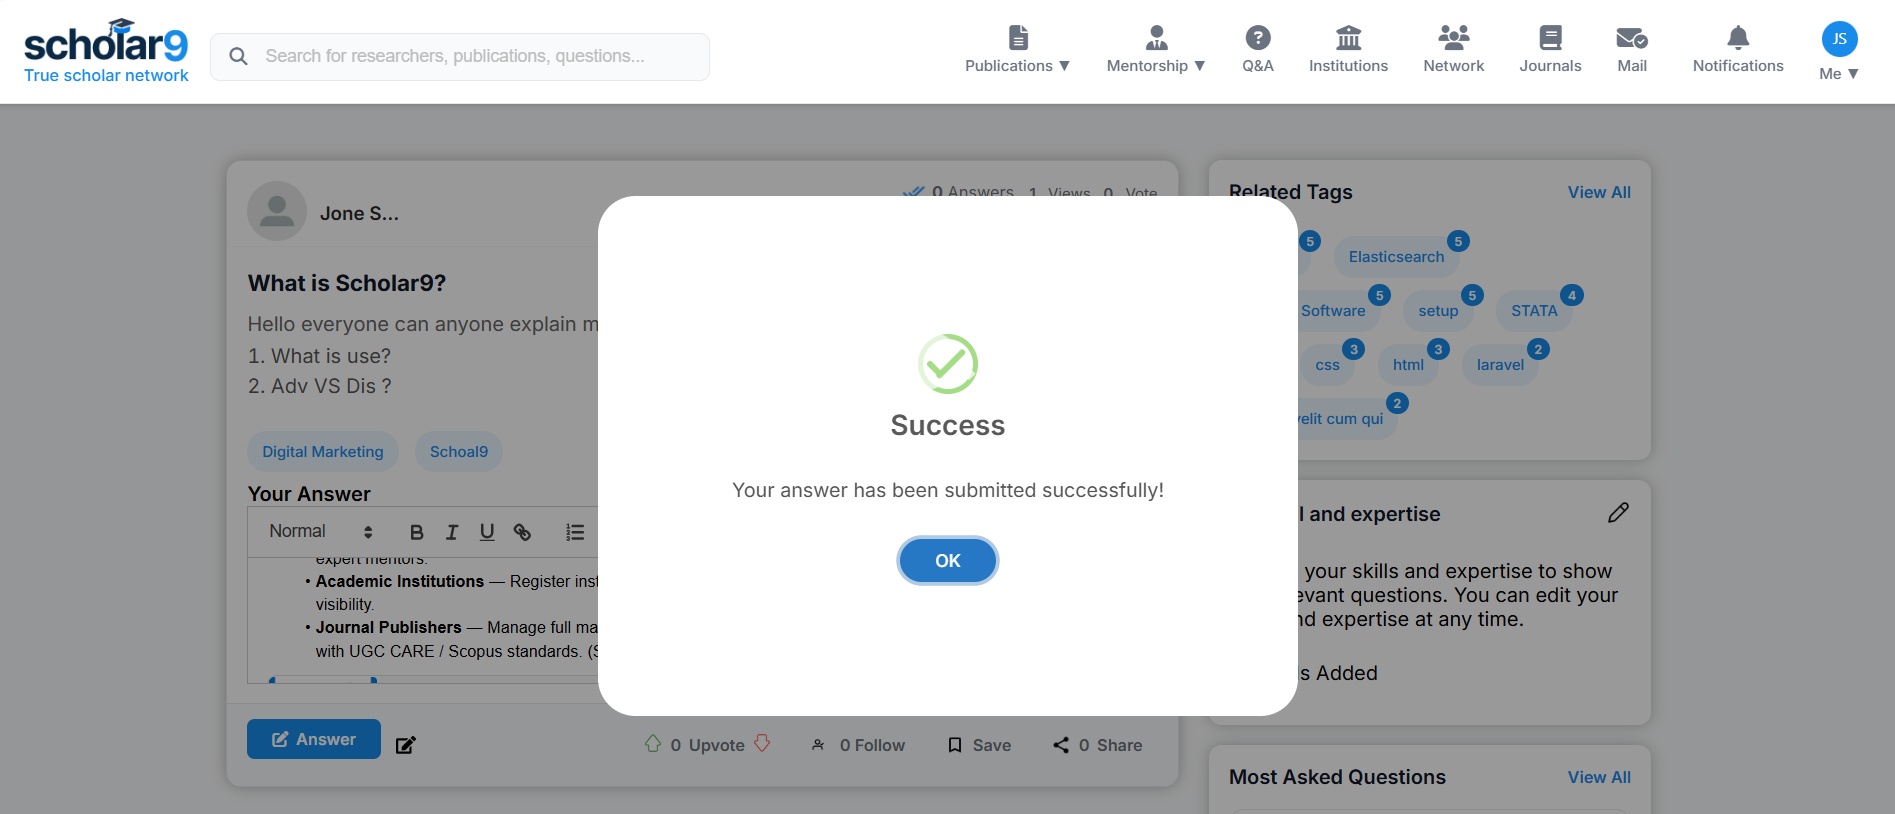
Upon submitting, a success popup will confirm that your answer has been published. It is now visible to the community!
Once an answer is posted, several management controls are available based on your permissions:
- 1. Edit Answer: If you wrote the answer, you can click the edit icon to modify your response.
- 2. Delete Answer: If you wrote the answer, you can permanently delete it.
- 3. Accept Answer (Tick Button): If you are the person who asked the original question and this answer solved your problem, you can click the green tick mark to officially accept it as the correct solution.
Connecting with On-Demand Academic Mentors
Accelerate doctoral workflows, book consultation calls, and get expert review help on drafts from industry leaders.
What is the Mentorship Portal?
The Scholar9 Mentorship Portal connects graduate students and researchers with seasoned academics and industry professionals across domains like Software Engineering, Product Design, Business Strategy, and more. Users can book dedicated time with experts to overcome research hurdles.
Key Benefits
- For Mentees (Researchers): Gain direct access to world-class experts. Overcome academic roadblocks quickly by booking 1-on-1 strategy calls, getting your research drafts reviewed, and learning industry best practices that accelerate your career growth.
- For Mentors: Establish yourself as a Subject Matter Expert (SME). Build your academic reputation globally by helping the next generation of researchers while monetizing your expertise on your own schedule.
The Mentee Experience — Connect & Learn
A Mentee is any student, academic researcher, PhD candidate, or industry professional seeking expert guidance to overcome academic or career hurdles.
Who Can Benefit as a Mentee?
- PhD & Research Scholars: Get feedback on thesis drafts, choose proper methodologies, and prepare for viva/defenses.
- Students & Junior Professionals: Gain industry guidance in Software Engineering, Product Design, Business Strategy, and more.
- Academic Writers: Improve manuscript quality, structure research papers, and learn publishing strategies.
What Services Can You Book?
Mentees can access multiple service channels offered by mentors:
- 1-on-1 Video Consultations: Book a private Zoom/Google Meet video session to discuss your queries face-to-face.
- Ask Queries (Q&A): Send text-based questions and receive detailed, expert answers within a set response timeline.
- Attend Webinars: Enroll in live group classes and workshops hosted by top industry and academic leaders.
- Download Digital Resources: Get access to exclusive templates, research guides, and tutorial files.
How to Find and Filter Mentors
Finding the right mentor is simple and intuitive:
From the Mentorship Home page, click the Find a Mentor button to open the global list of all available mentors.
Use the sidebar filters to narrow down the list by Domain Category, specific Expertise Tags, pricing models, or languages to locate your ideal guide.
Becoming a Mentor
We maintain a high standard for our mentors. To activate a mentor profile, users must complete a rigorous onboarding process:
- Profile Prerequisites: You must have a complete Reviewer Profile, including verified education, professional designations, and defined skill/research tags.
- Verification: All mentor accounts require administrative approval before they appear in public search results, ensuring a safe and high-quality environment.
- Global Reach: Mentors can configure their spoken languages, domains, and specific expertise tags to attract the right mentees.
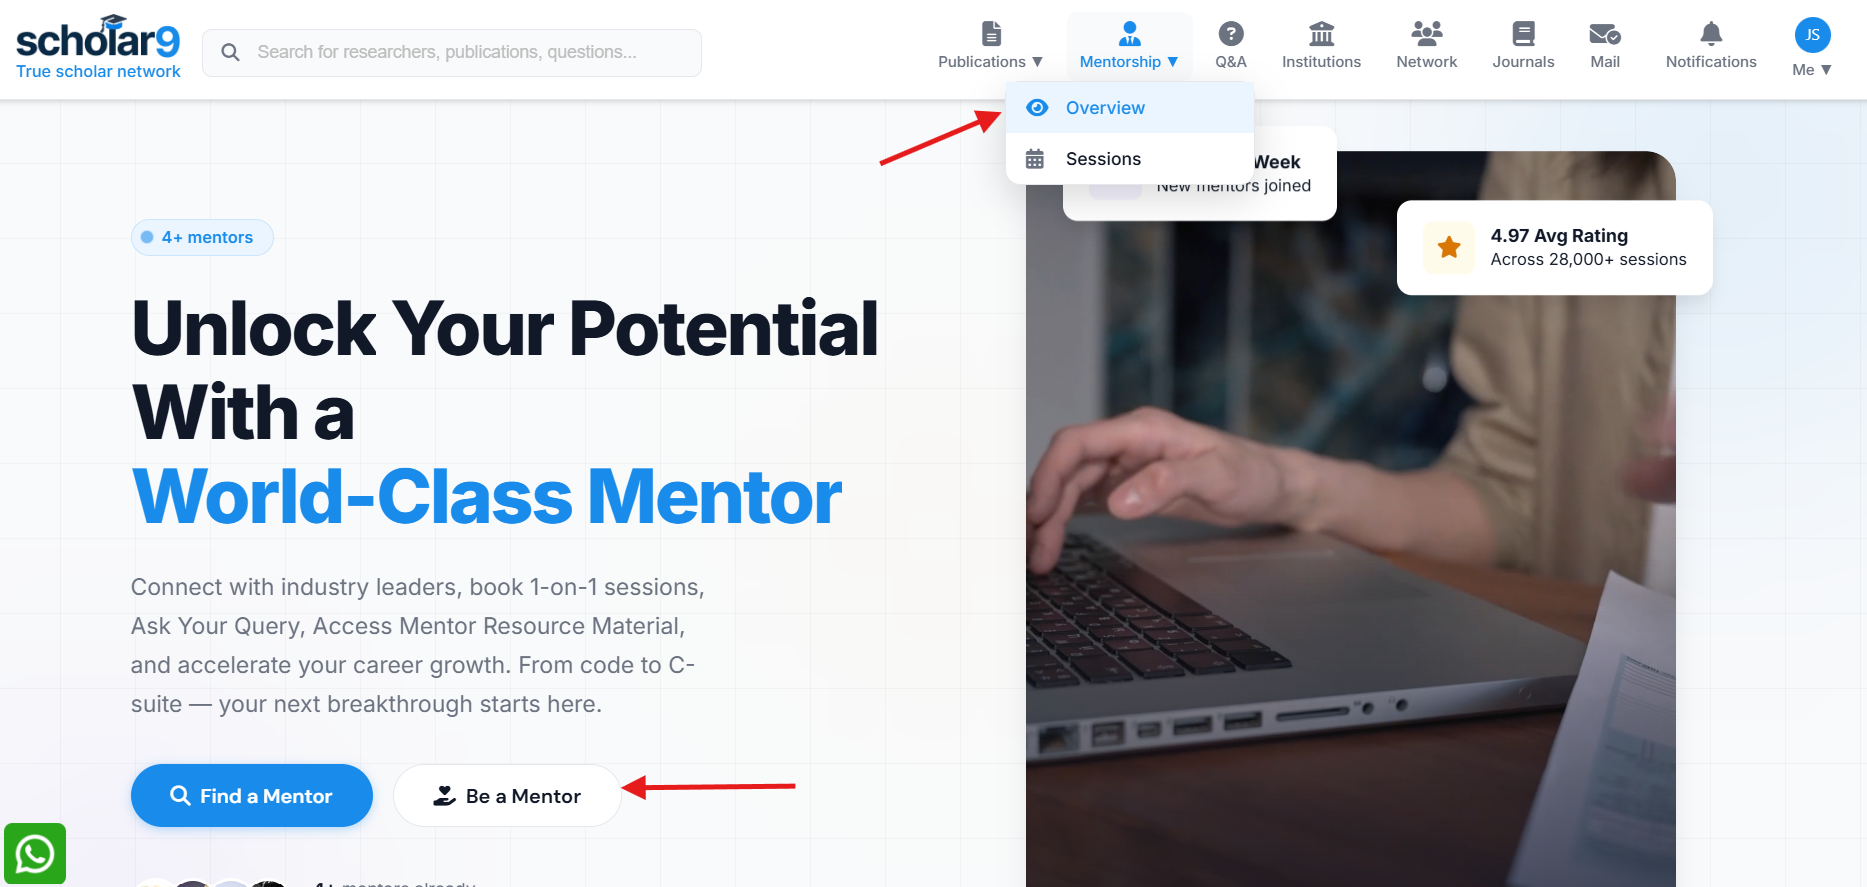
How to Apply to be a Mentor
Hover over Mentorship in the header navbar and click on Overview from the dropdown. Once the Mentorship Home page opens, explore it and click the Be a Mentor button.
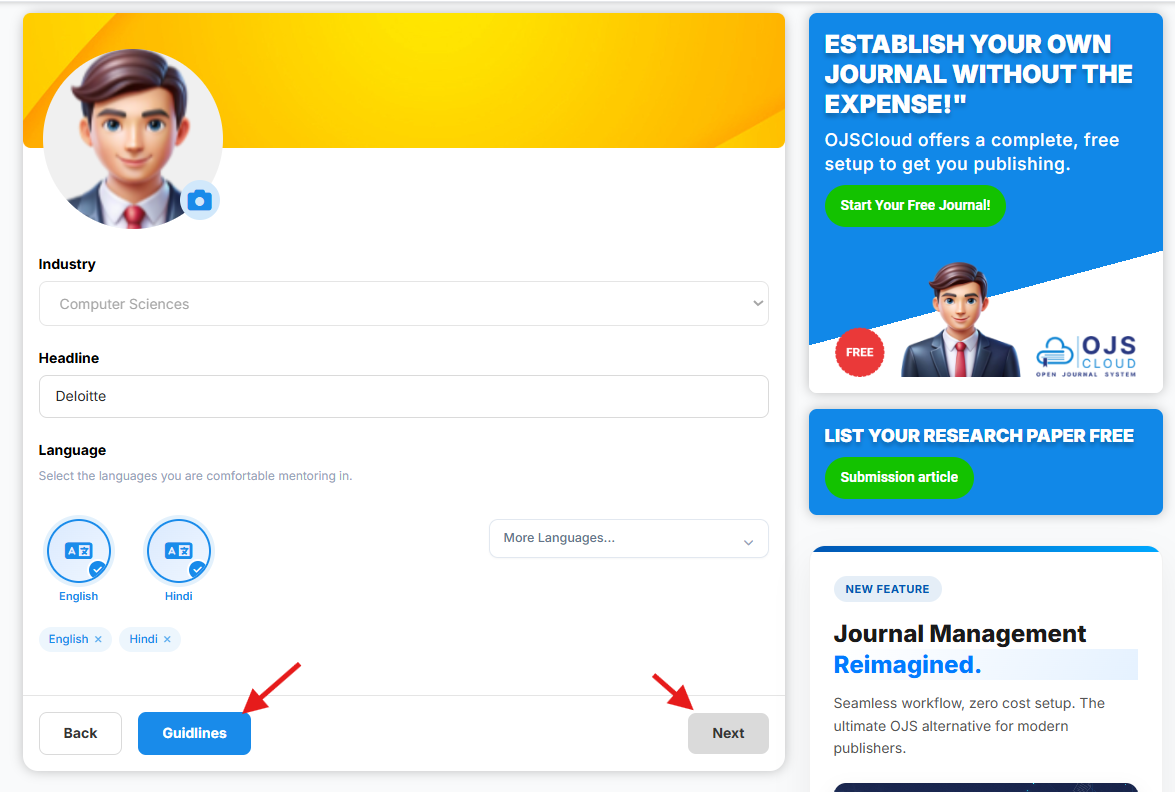
Once your profile is verified, the application form will open. In the first step:
- User Image: Pre-filled from your profile.
- Industry: Pre-filled based on your profile (cannot be edited here).
- Headline: Enter your professional headline.
- Language: Select the languages you are fluent in.
Note: We highly recommend clicking the Guidelines button to read the instructions before applying. Once filled, click the Next button.
In the second step, you will define your specific expertise:
- Domain: Select your primary domain.
- Topics: Based on your selected domain, a list of topics will appear. Select the relevant ones.
- Skills: Enter up to 10 specific skills. Providing accurate skills ensures mentees can find you easily.
Review your details and submit the form to finalize your application.

The Mentor Dashboard
Once your profile is verified, you will gain access to the powerful Mentor Dashboard. This is your command center for managing your mentorship business:
- Your Availability: Set and update your working hours and specific time slots for 1-on-1 video consultations.
- Your Services: Create and fully customize your offerings. Set call durations, query response SLAs, schedule webinars, upload resource files, and define your pricing models.
- Coupon Codes: Generate custom discount codes to share with specific mentees or for promotional campaigns.
- Achievements & Analytics: Track your performance with interactive charts displaying your total earnings, session counts, views, and conversion rates.
- Maintain Bookings: View upcoming calls, track completed sessions, and easily manage your consultation schedule.
- Your Profile: Continuously update your public-facing bio, skills, and FAQs to attract more mentees.
Available Mentor Services
Mentors can configure a variety of customized service offerings to support mentees:
- 1-on-1 Video Consultations: Set specific call durations and dynamically manage your calendar availability (e.g., 30-min strategy calls).
- Direct Queries & Follow-ups: Offer text-based query resolutions with guaranteed response times and optional follow-up allowances.
- Webinars: Schedule and monetize group webinar sessions with automated timezone conversions.
- Resource Sharing: Provide exclusive access to downloadable research templates and resource files.
Finding the Right Mentor
The portal includes an advanced discovery engine to help mentees find the perfect match:
- Smart Filtering: Filter mentors by specific domains, skill tags, price ranges (including free services), and online availability.
- Top Mentor Ranking Algorithm: The platform automatically highlights "Top Mentors". This premium status is dynamically awarded to mentors who maintain a high average rating (4.0+ stars) and have a proven track record of successful, paid booking completions.
Scholar Mail — In-Platform Messaging
Communicate directly with researchers, mentors, and collaborators — privately and professionally, without sharing personal email addresses.
What is Scholar Mail?
Scholar Mail is Scholar9's built-in private messaging system. It allows researchers to send and receive messages directly within the platform — keeping professional academic communication in one secure place, accessible from anywhere in the world.
Key Benefits
- Privacy First: You never need to share your personal email address. All communication happens within Scholar9, keeping your contact details private.
- Collaborate Easily: Reach out to co-authors, potential collaborators, or researchers whose work interests you — directly from their Scholar9 profile.
- Mentor Communication: Use Scholar Mail to stay in touch with your assigned mentor, share drafts, ask follow-up questions, and coordinate sessions.
- File Sharing: Send research documents, paper drafts, or data files securely through the messaging interface.
Navigating to Scholar Mail
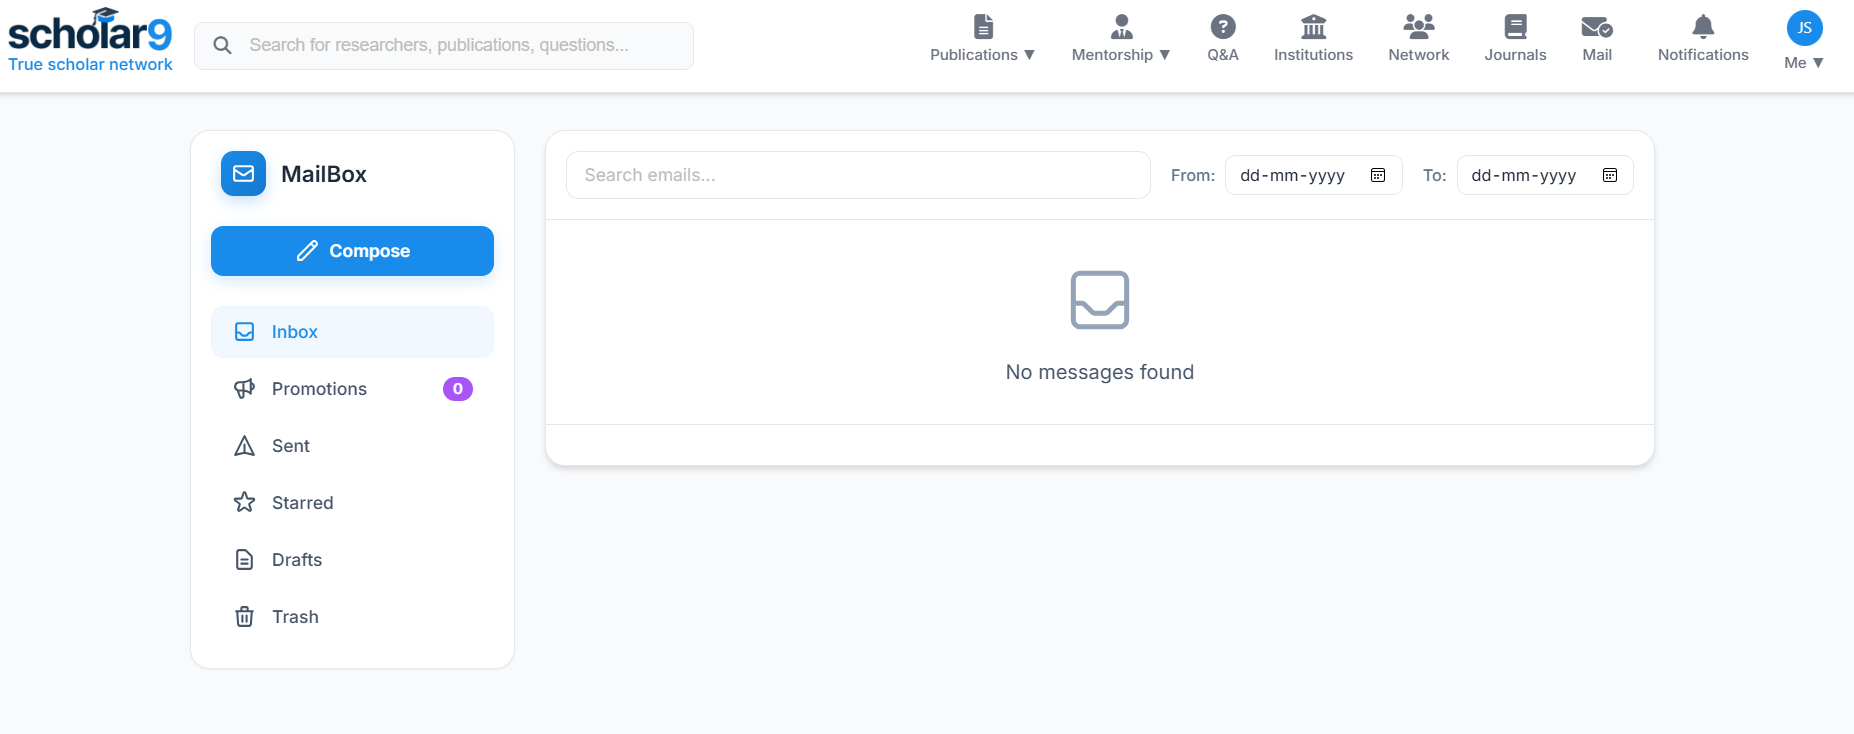
Click on the Mail icon located in the global header navbar. A popup will appear showing your recent messages. Click the View All button at the bottom of the popup to seamlessly navigate to the full Scholar Mail dashboard.

Mail Interface Overview
The Scholar Mail dashboard provides a clean, familiar interface to manage your academic communications.
- Compose: Open the editor to create and send a new message.
- Inbox: View all received messages from peers and mentors.
- Promotions: View special platform announcements and site-wide promotions.
- Sent: Access messages you have successfully delivered.
- Starred: Quickly access important messages that you have specifically marked with a star.
- Drafts: Access unfinished messages you have saved to complete later.
- Trash: View deleted messages.
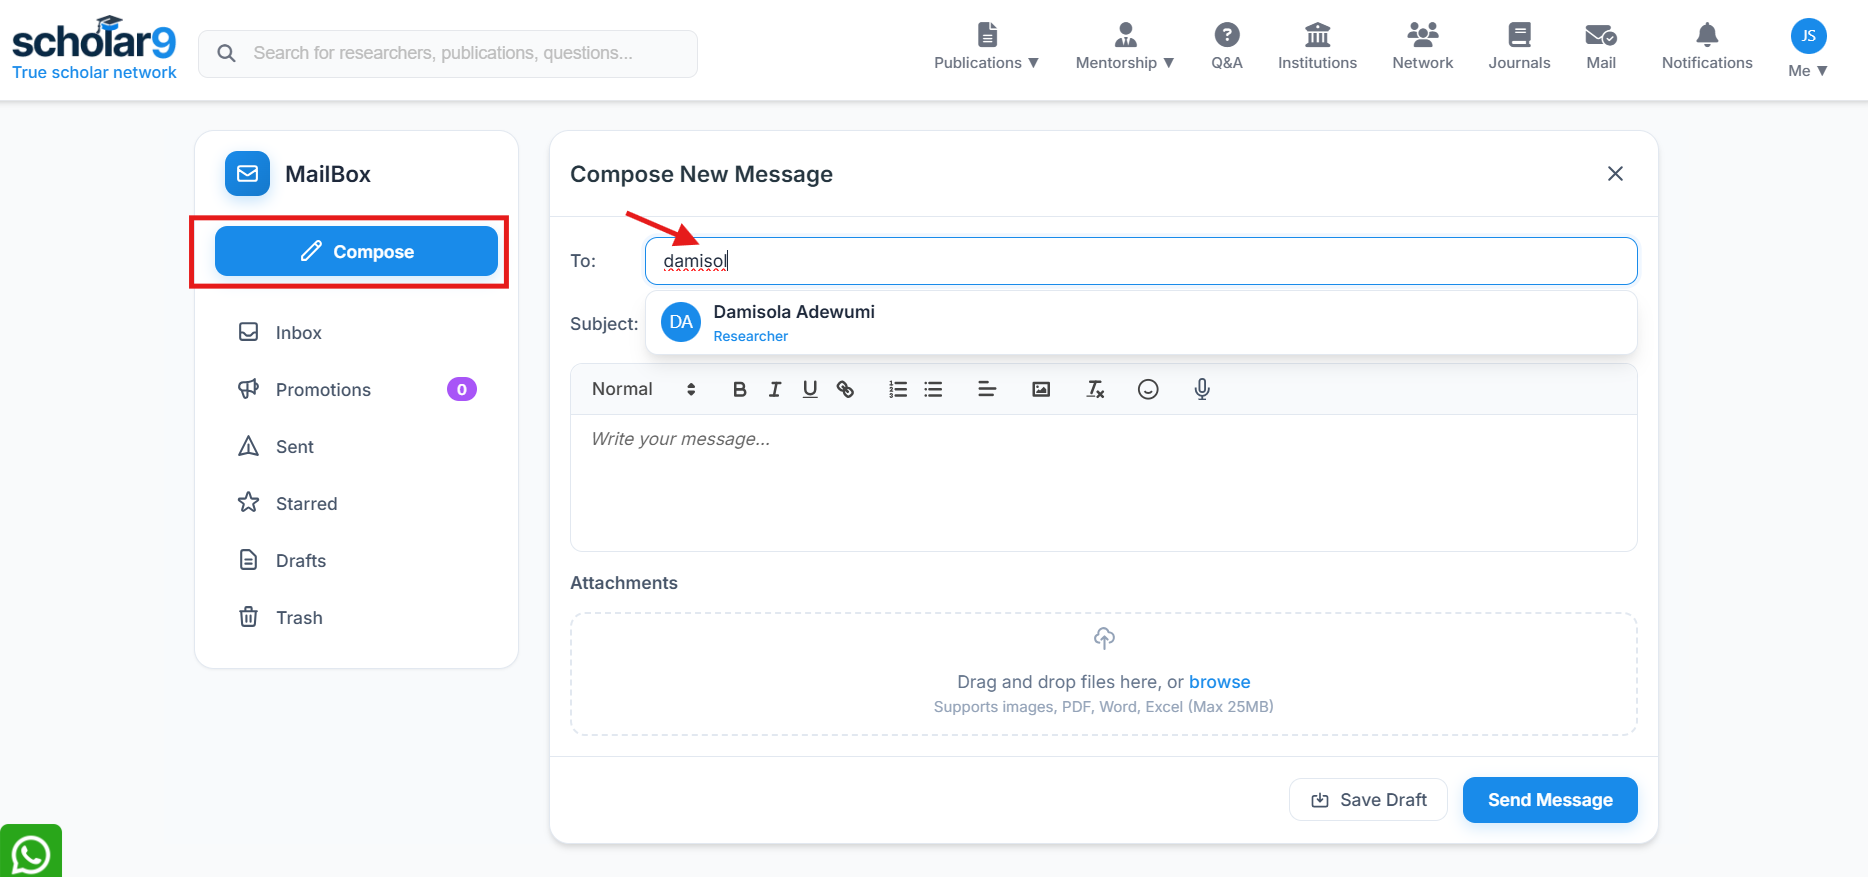
How to Compose and Send Mail
Click the Compose button to open the mail editor. Here's how to structure your message:
- To: Start typing a researcher's name or username. The system will dynamically search and list researchers matching your keyword. Select the correct recipient from the dropdown list.
- Subject: Enter a clear and concise subject line for your message.
- Body: Write your message. The editor supports standard rich-text formatting.
- Attachments: You can attach files to your message (e.g., PDFs, datasets). Please note there is a strict Max 25MB file size limit for all attachments.
Publication — Share Your Research Globally
Upload and deposit your research papers, preprints, and thesis documents into the Scholar9 repository for global discovery and citation.
What is Publication?
The Publication portal allows researchers to upload their published or unpublished research directly to Scholar9. Once deposited, your work becomes discoverable by researchers globally, increasing your citation potential and academic impact.
What You Can Deposit
- Published Journal Articles: Upload the final published version or an accepted manuscript of your peer-reviewed paper.
- Preprints: Share early-stage research findings before formal peer review — widely accepted in fields like Physics, Biology, and Computer Science.
- Conference Papers: Upload papers presented at academic conferences to improve their discoverability beyond the conference proceedings.
- Book Chapters & Reports: Share book chapters, technical reports, and working papers for broader academic reach.
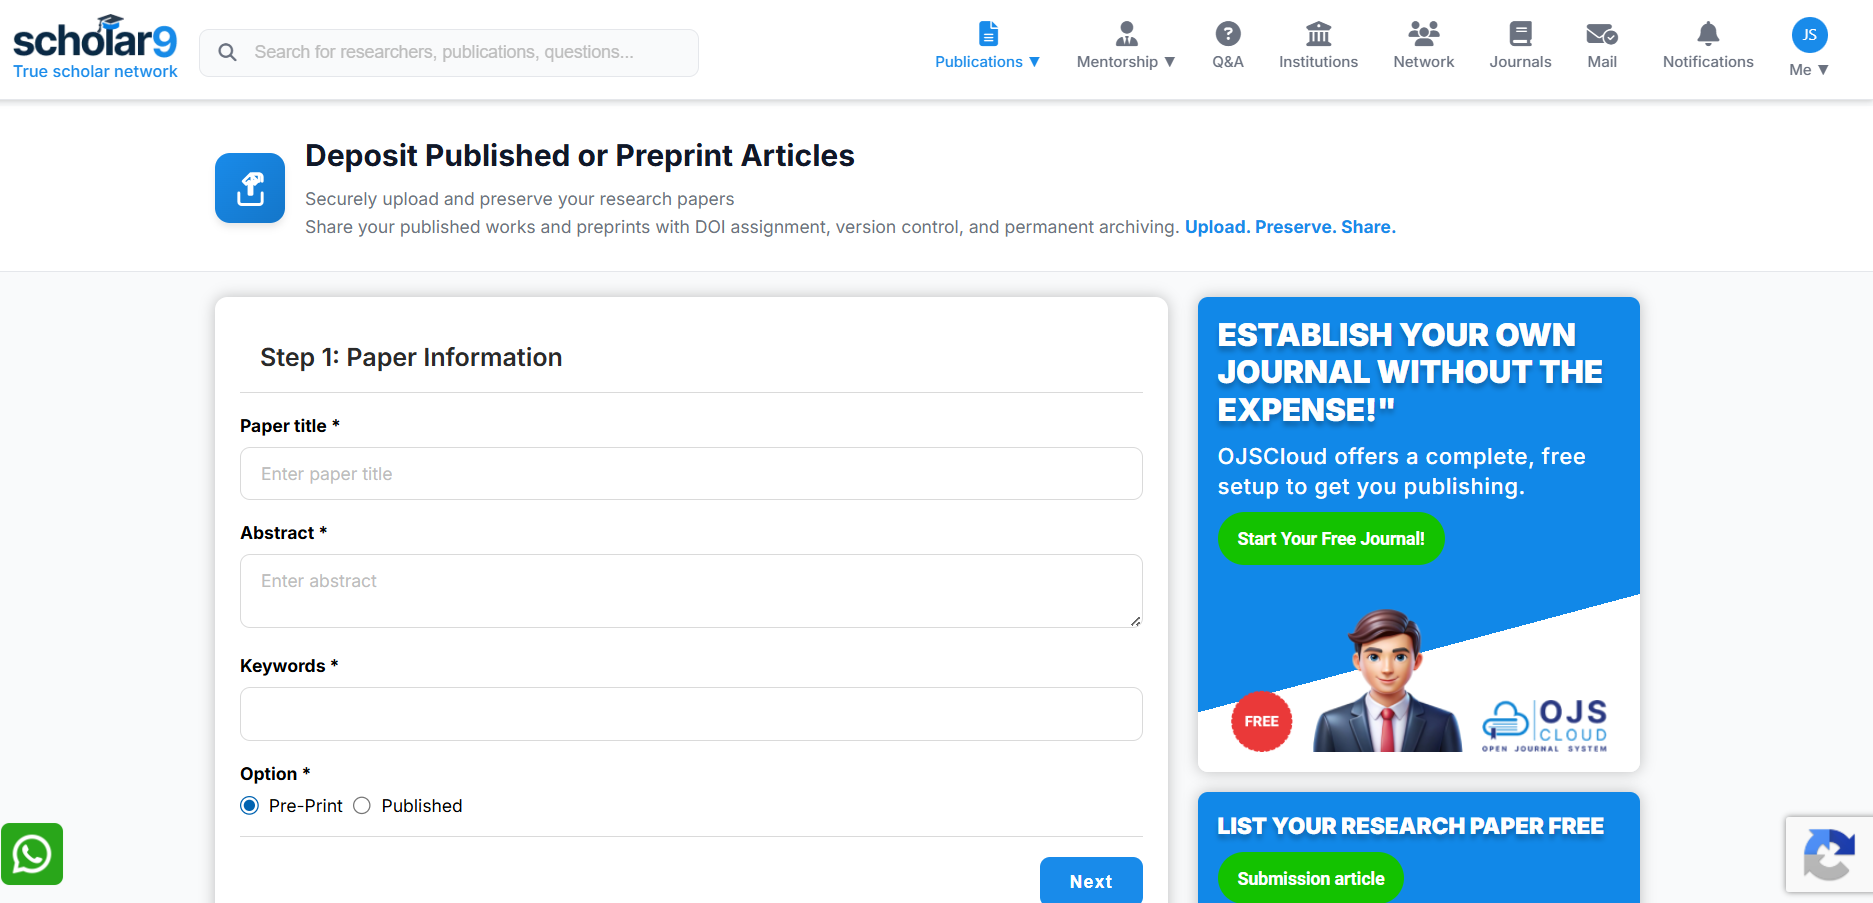
How to Submit a Paper (Deposit Article)
Hover over Publication in the global header navbar. From the dropdown menu, click on Deposit Article.

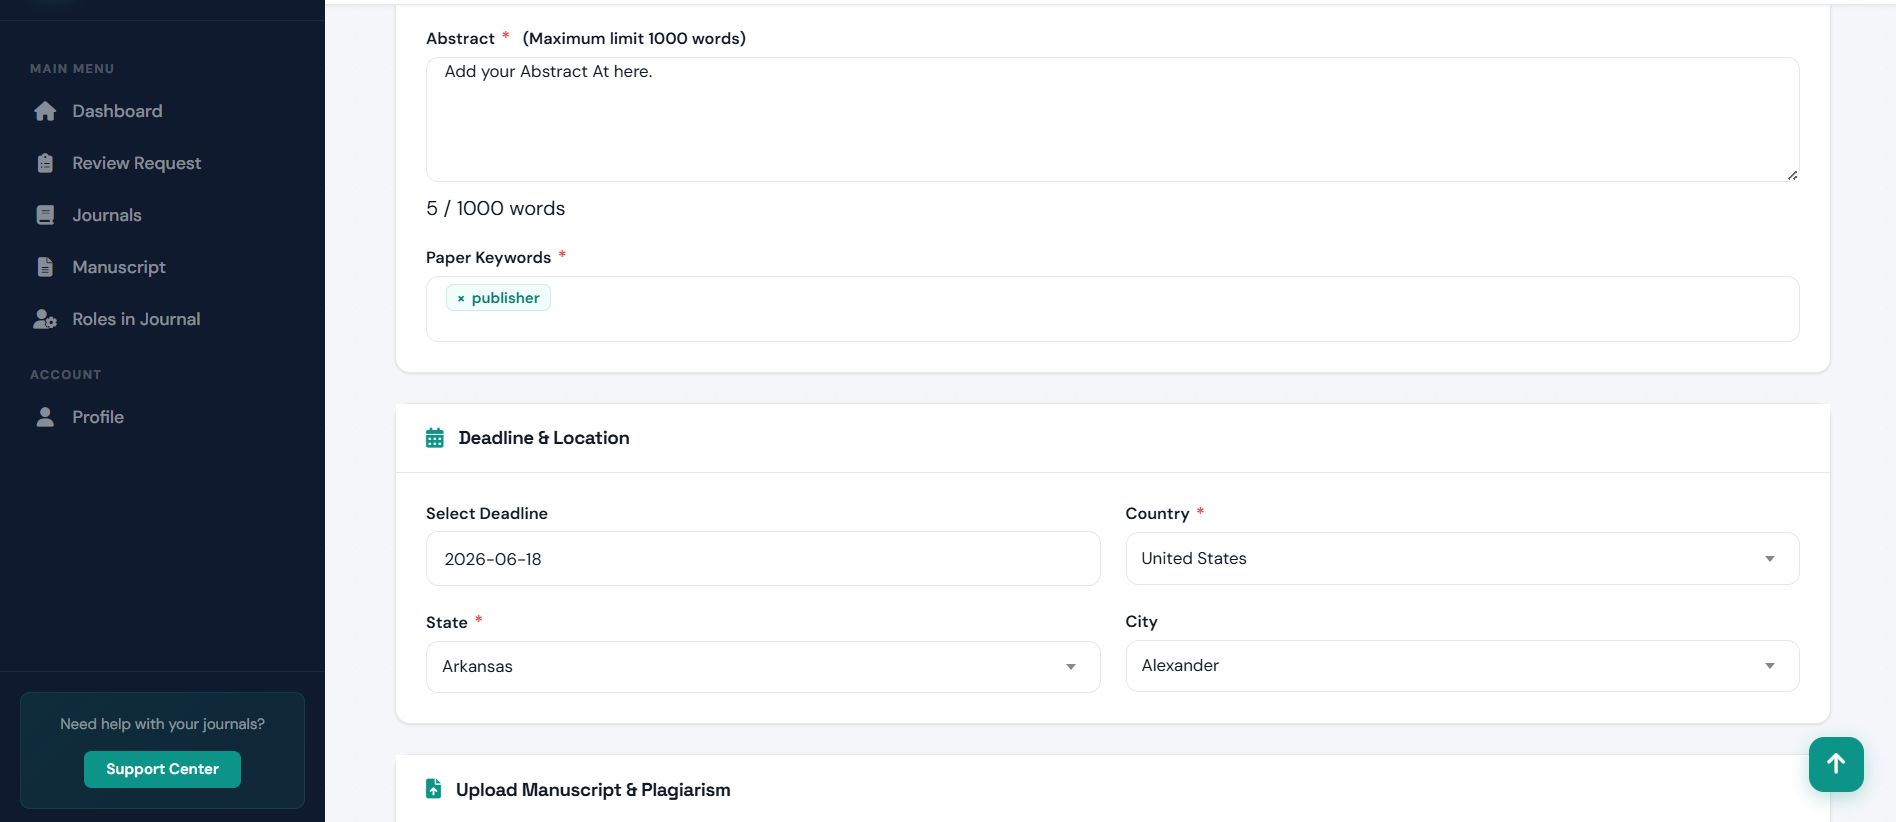
Fill out the general information regarding your paper. This includes titles, abstracts, and categorization.
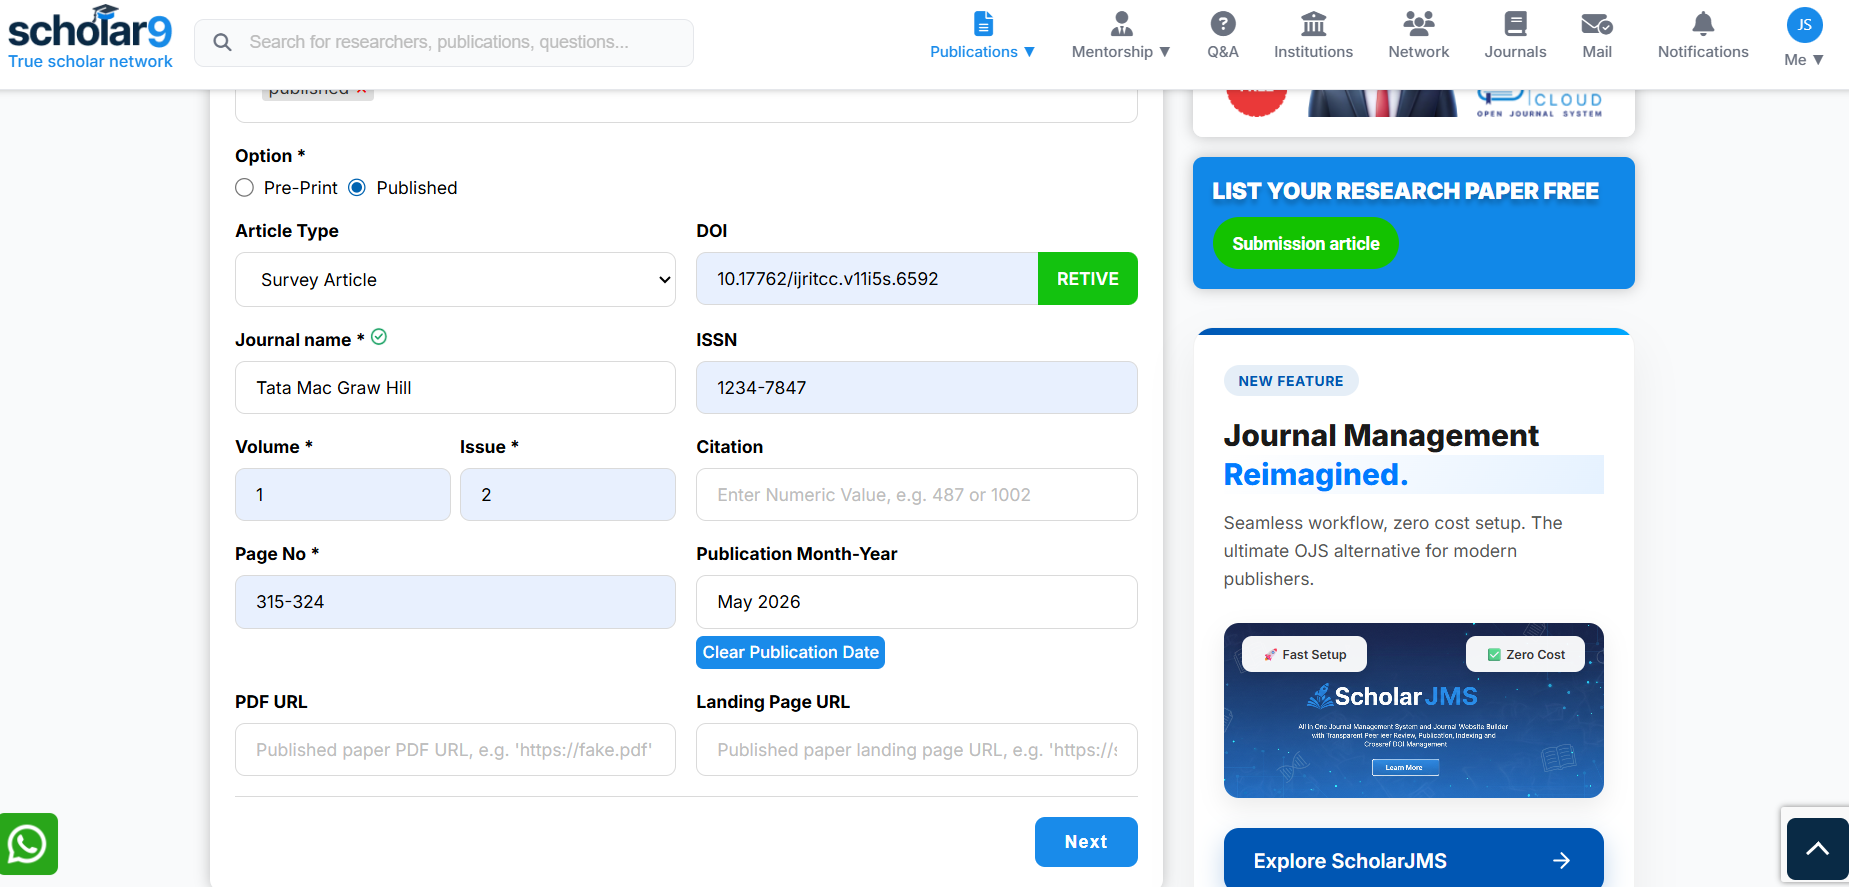
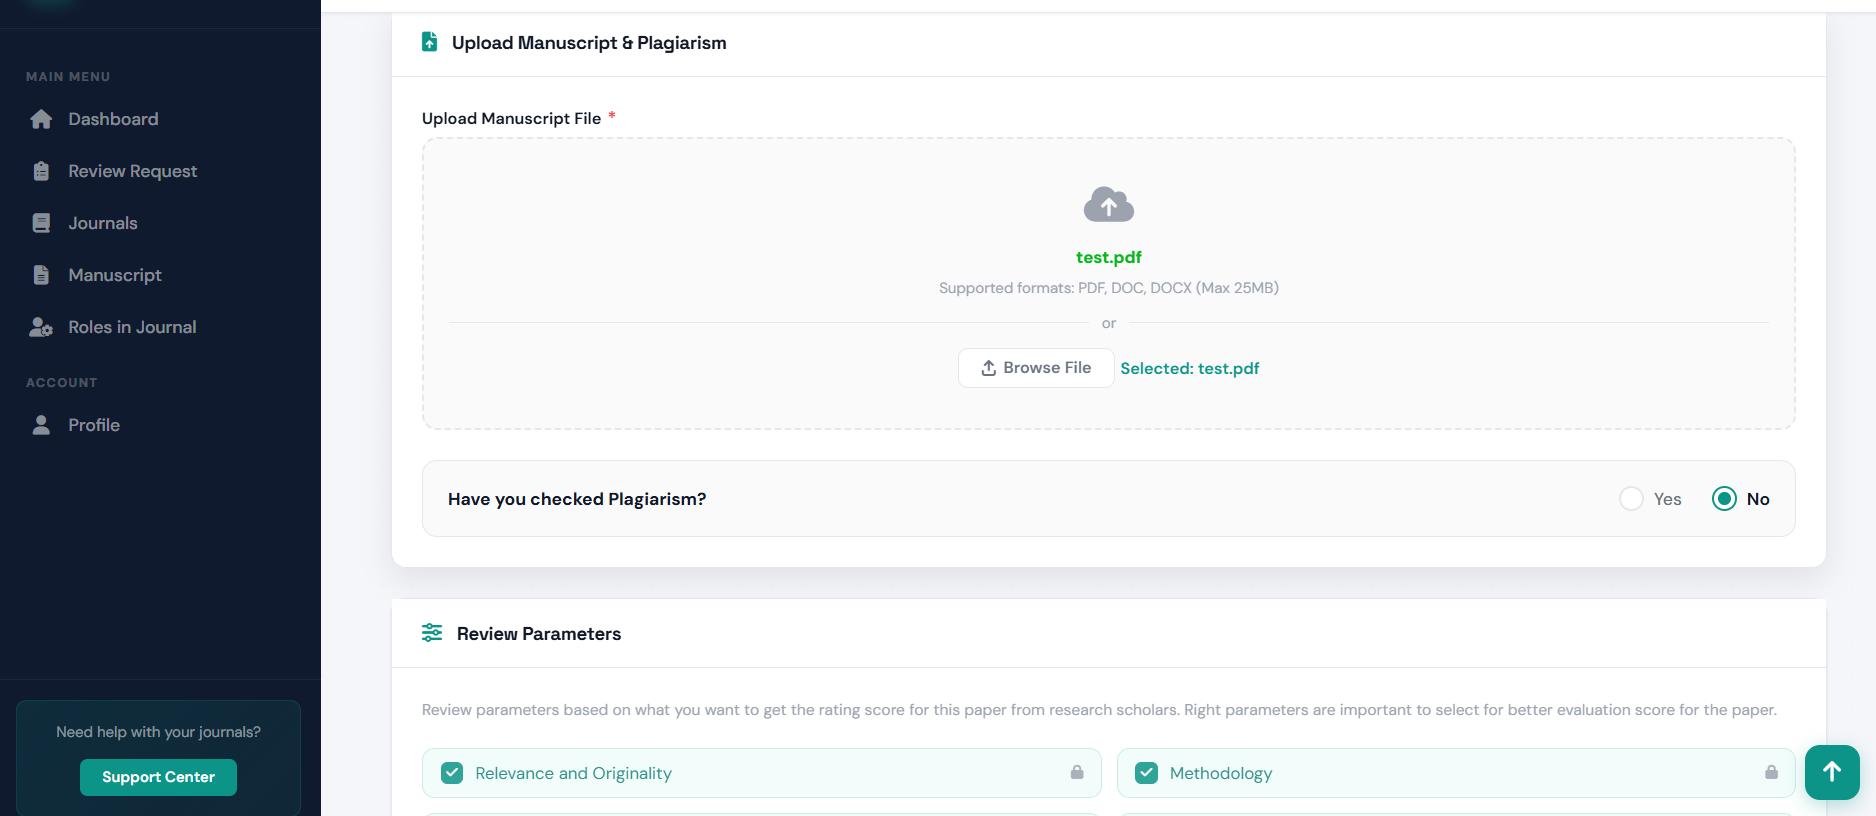
After clicking Next, you will proceed to Step 2. Here, you will upload the actual PDF file of your manuscript and fill out the details of all contributing authors. Submit the form when ready.
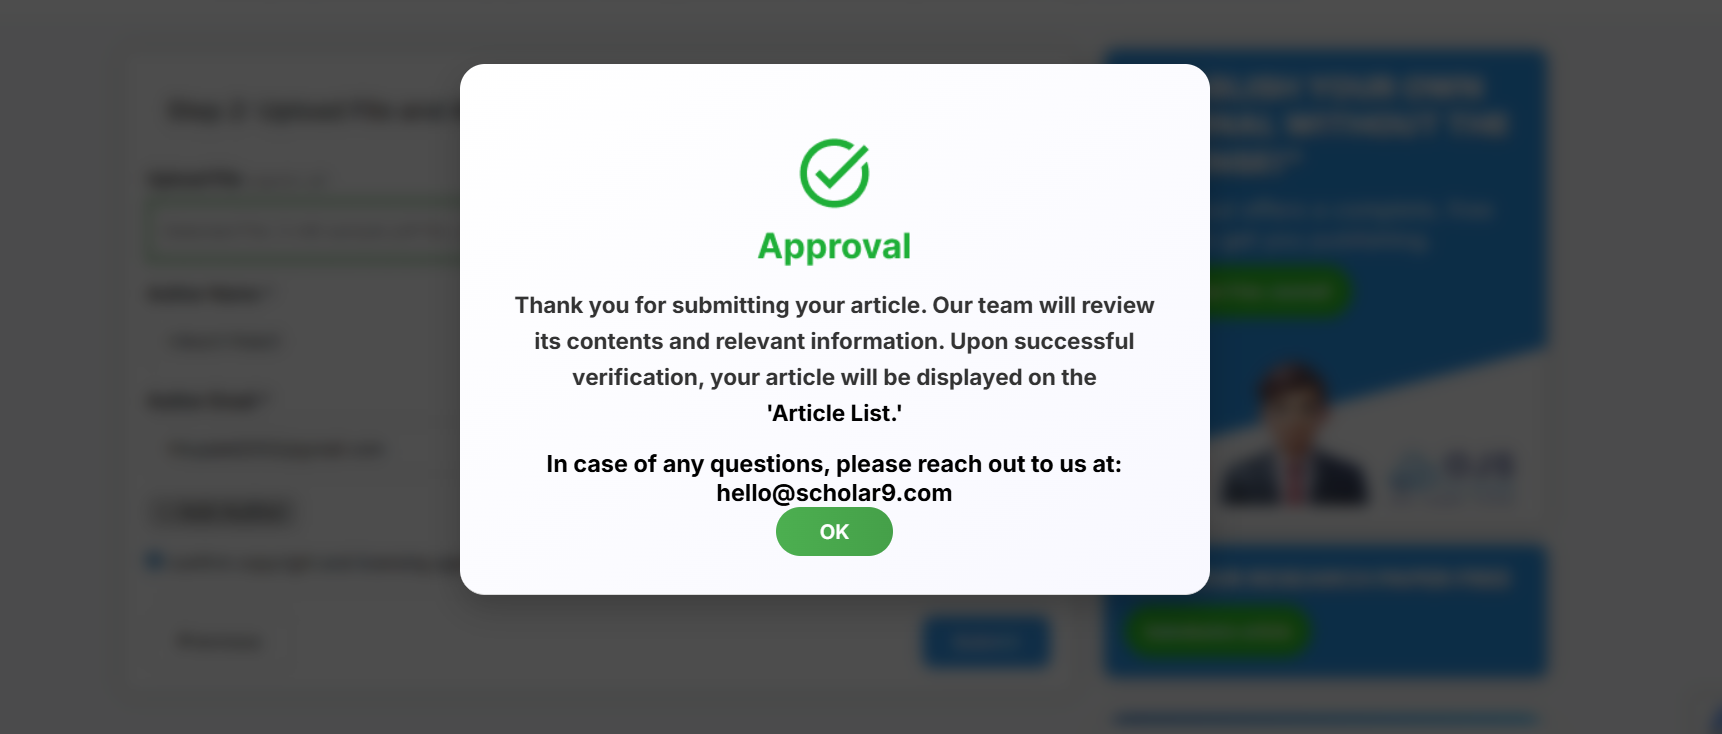
Once submitted, a confirmation popup will appear. The system will hold your article for administrative verification before it becomes publicly visible.
Exploring Publications (Article List)
The Article List serves as Scholar9's global directory for all verified research papers deposited by researchers worldwide.
- Access the List: Hover over Publication in the global header navbar and select Article List from the dropdown menu.
- Browse Global Research: The page displays a comprehensive, searchable list of all public papers, preprints, and articles deposited by all users across the Scholar9 platform.
- View Full Descriptions: Click on any respective paper or article from the list to view its dedicated page, complete with full descriptions, author details, and attached files.
- Easy Reading Access: Seamlessly access and read the full text of deposited articles directly through the platform.
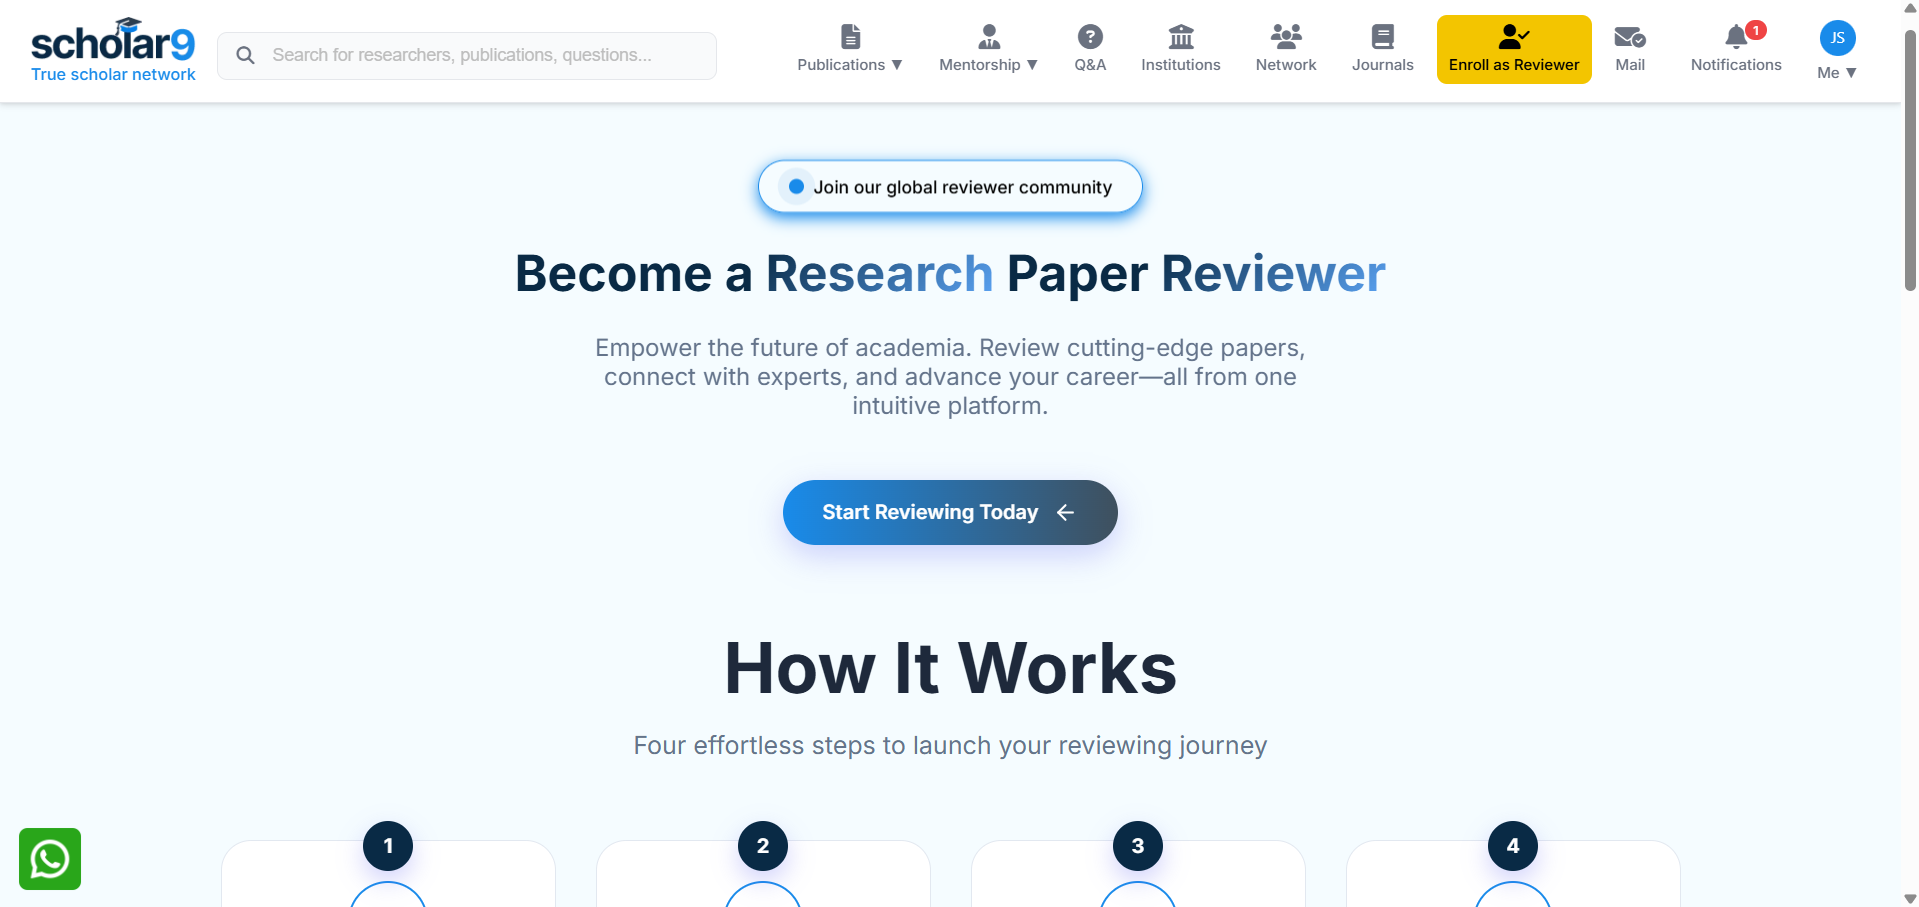
Reviewer Panel — Evaluate Research & Earn Peer Credits
Enroll as an expert peer reviewer, evaluate double-blind submissions, track review decisions, earn peer credits, and receive certificates.
1. What is the Reviewer Panel?
Scholar9 implements a strict Double-Blind Peer Review workflow to ensure academic integrity. The Reviewer Panel serves as a dedicated portal for verified academic researchers to manage their peer review assignments, evaluate manuscripts, submit comprehensive feedback, and track their contributions to scientific publications.
Who is it for?
The Reviewer Panel is designed for:
- Verified Researchers & Academicians: Active scholars with verified profiles who wish to review papers in their specialized domain.
- Professors & Subject Matter Experts: Experienced educators who want to guide the next generation of academic literature.
- PhD Candidates & Postdoctoral Scholars: Qualified academic students looking to build their peer evaluation credentials.
Key Benefits of Reviewing
- Earn Peer Credits: Accumulate publication credits that can be used to waive future Article Processing Charges (APC) for your own submissions.
- Receive Official Certificates: Download a verified, signed Scholar9 Reviewer Certificate for every completed review to enhance your academic portfolio.
- Academic Contribution: Help validate and maintain high scientific standards within your field of study.
2. Enrolling as a Scholar9 Reviewer
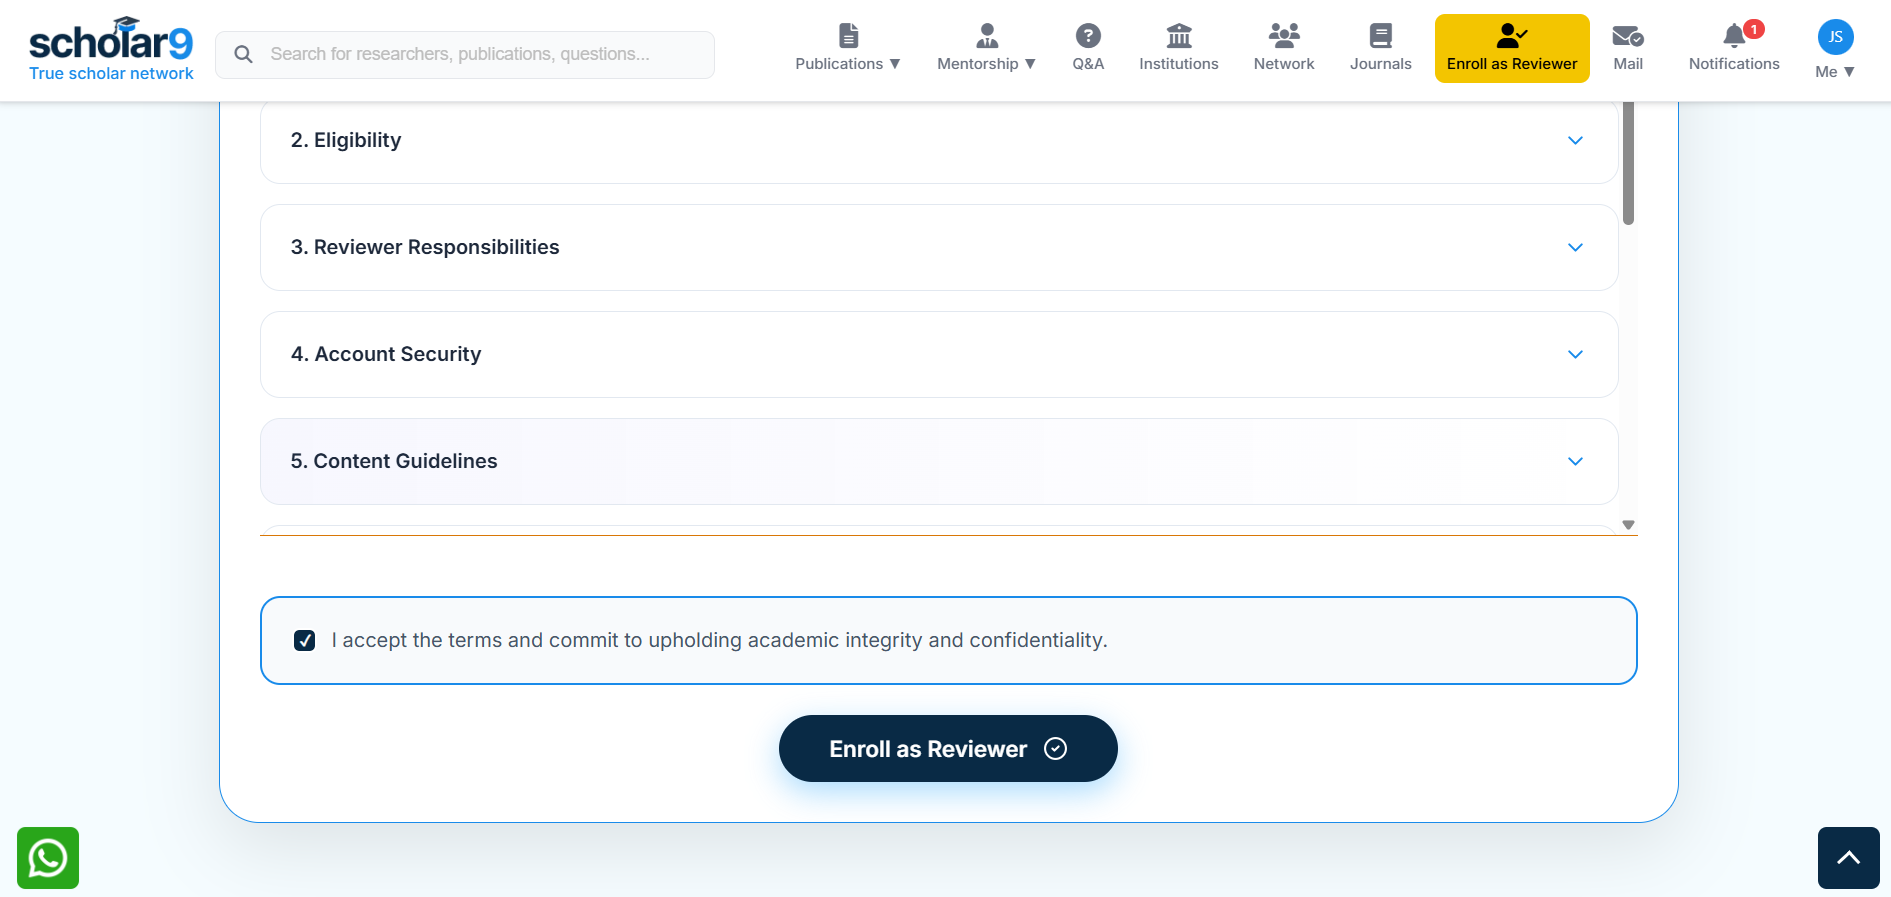
Any registered academic scholar can apply to join the peer reviewer network. The onboarding process is simple and transparent:
Navigate to the Reviewer Onboarding page via clicking on "Enroll as Reviewer" present on the Header Navigation bar (this button is only available for verified users).

Read the eligibility rules, evaluation guidelines, credit allocations, and double-blind ethical policies shown in the detailed accordion sections.
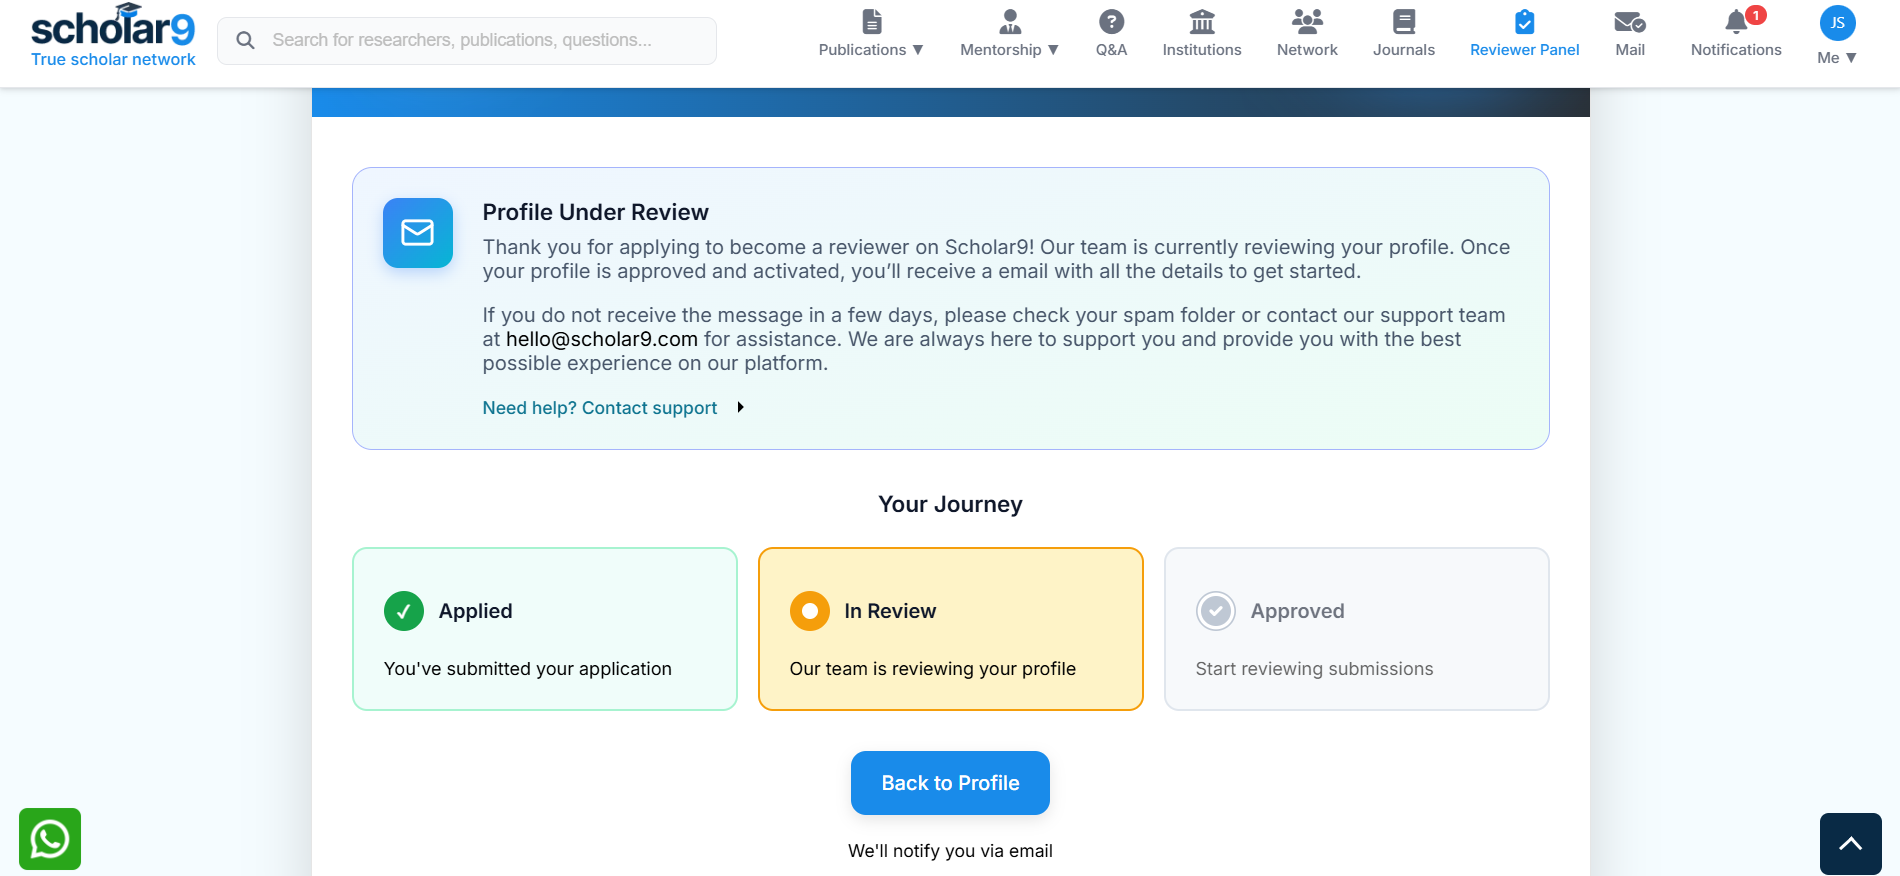
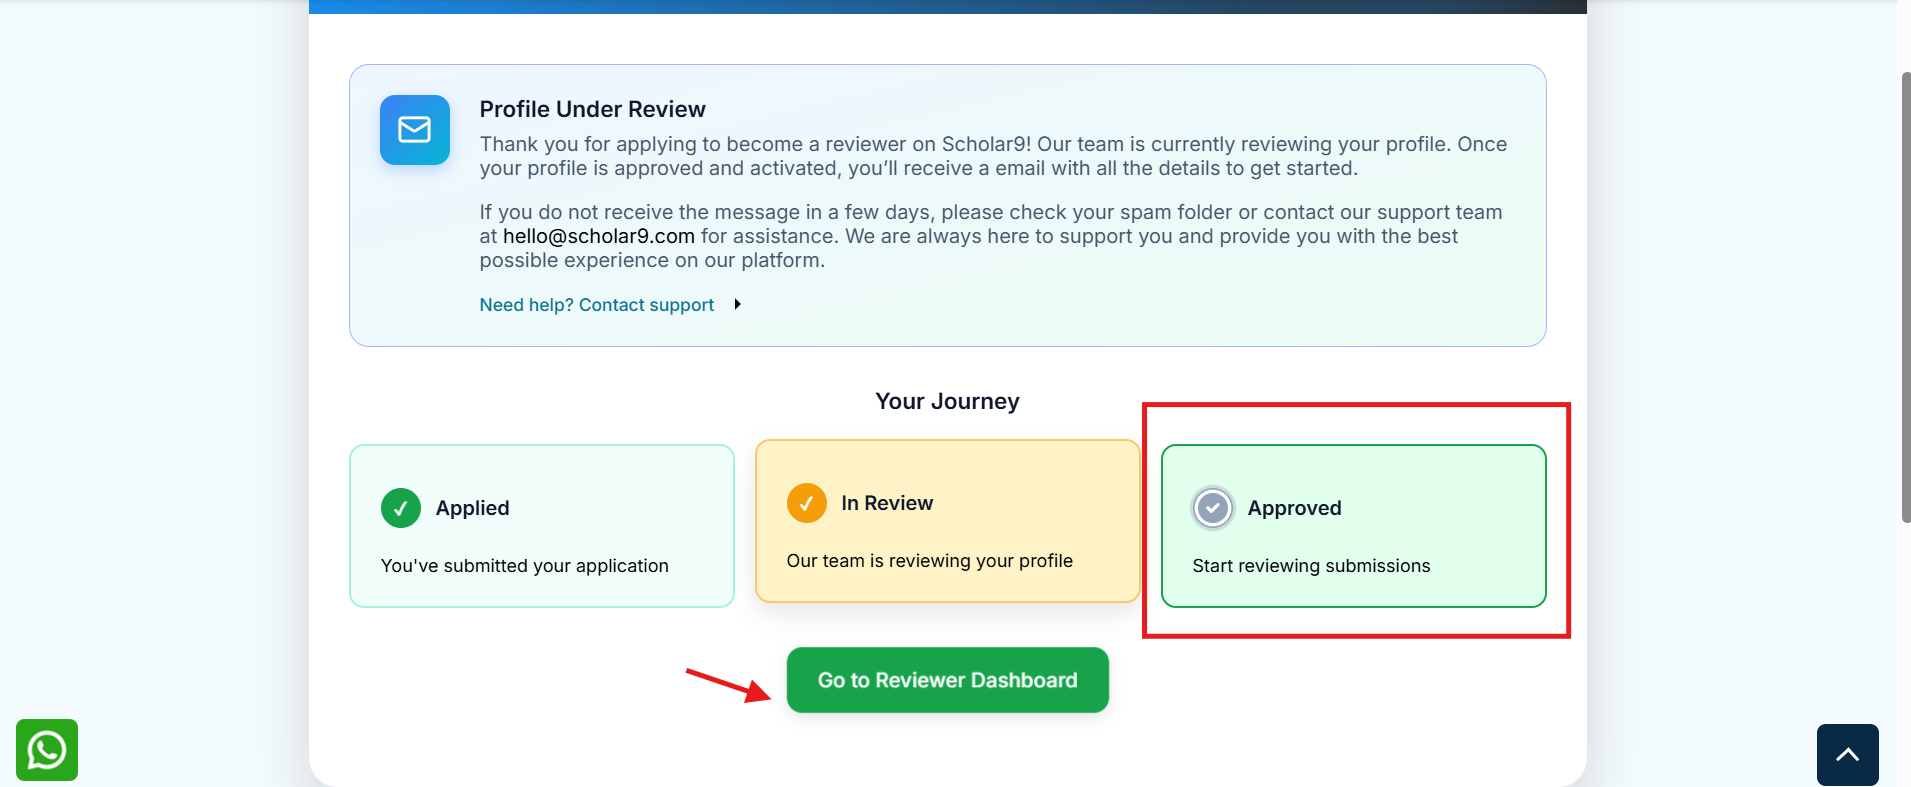
Check the declaration box acknowledging the peer review honor code, and click the Enroll as Reviewer button. The system will dispatch a notification to the editorial board for verification.
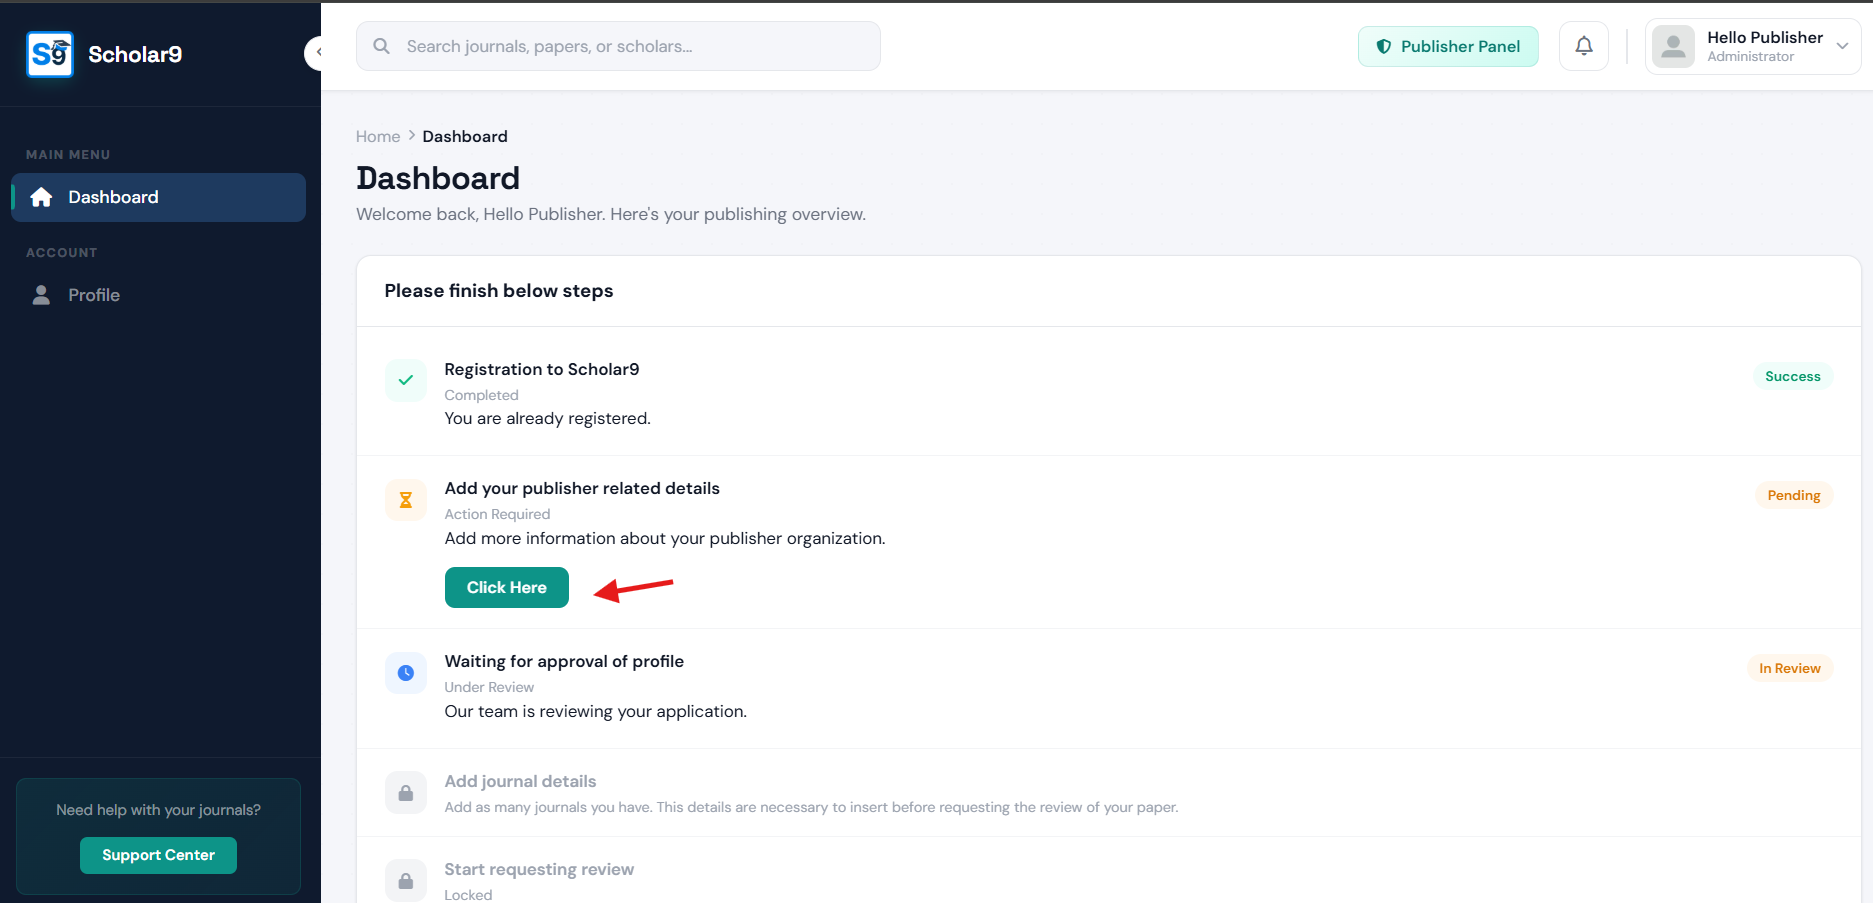
The Scholar9 administration team will review your application. Once your credentials and details are verified as genuine, you will be approved and granted full access to the Reviewer Dashboard.
3. The Reviewer Dashboard Overview
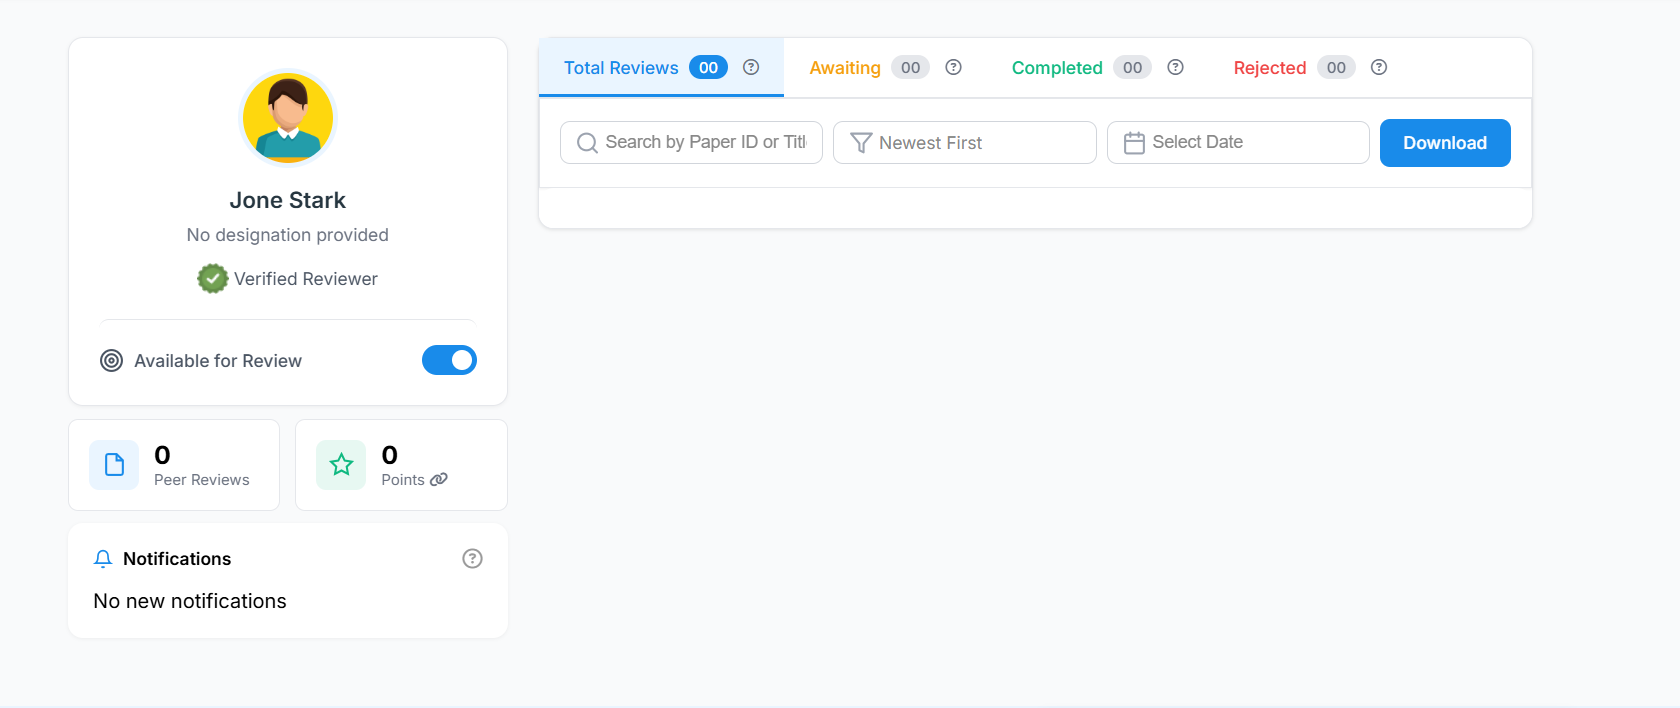
Once approved, your standard profile expands to include a robust Reviewer Dashboard. The dashboard organizes reviews using four distinct tabs to track your workload:
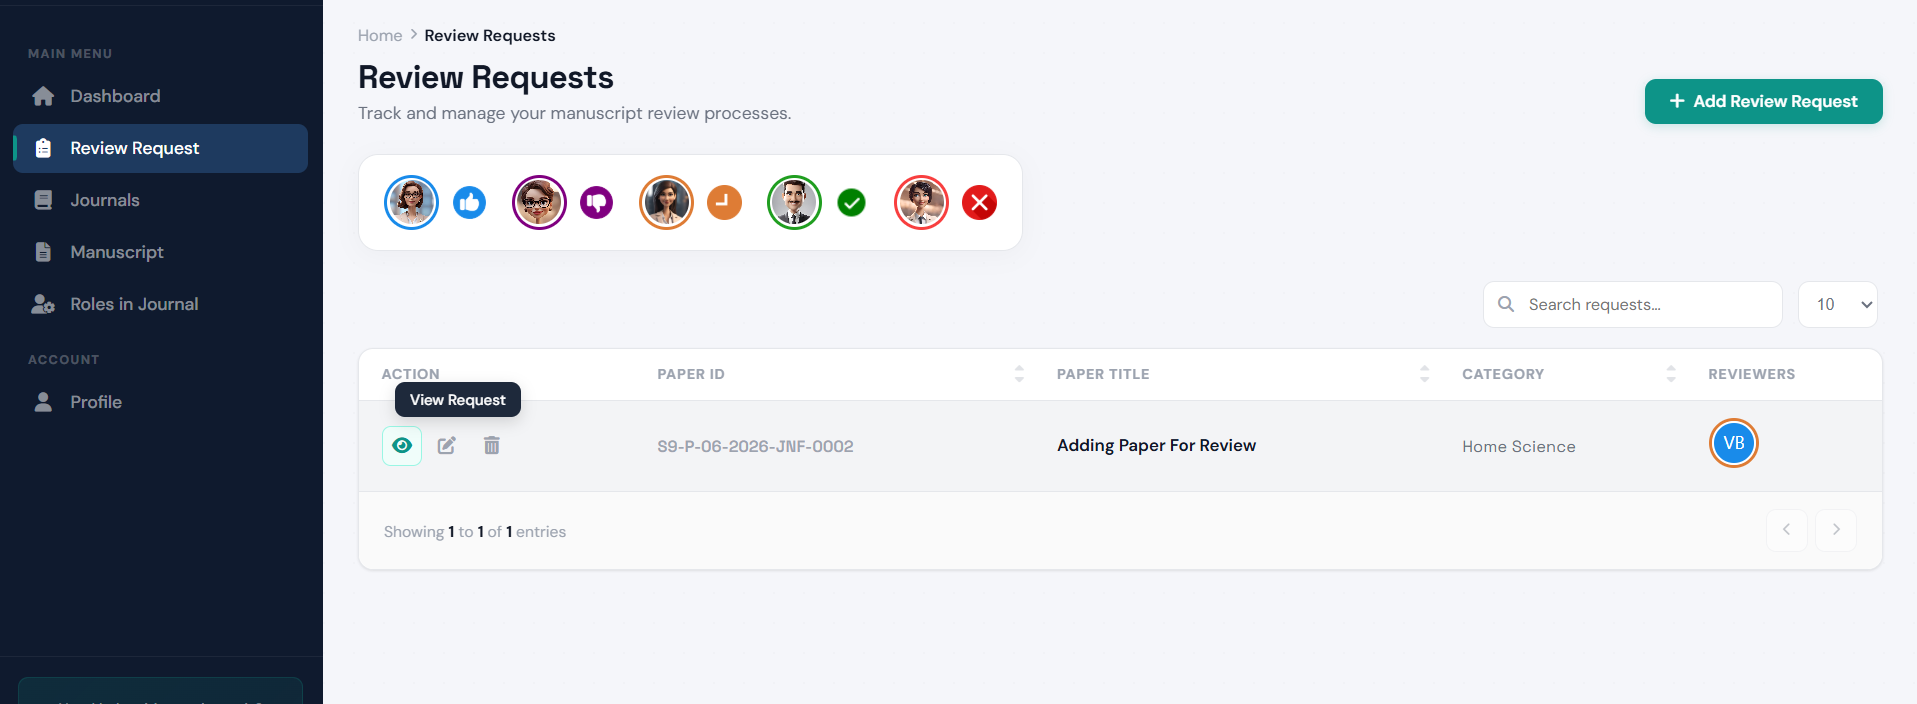
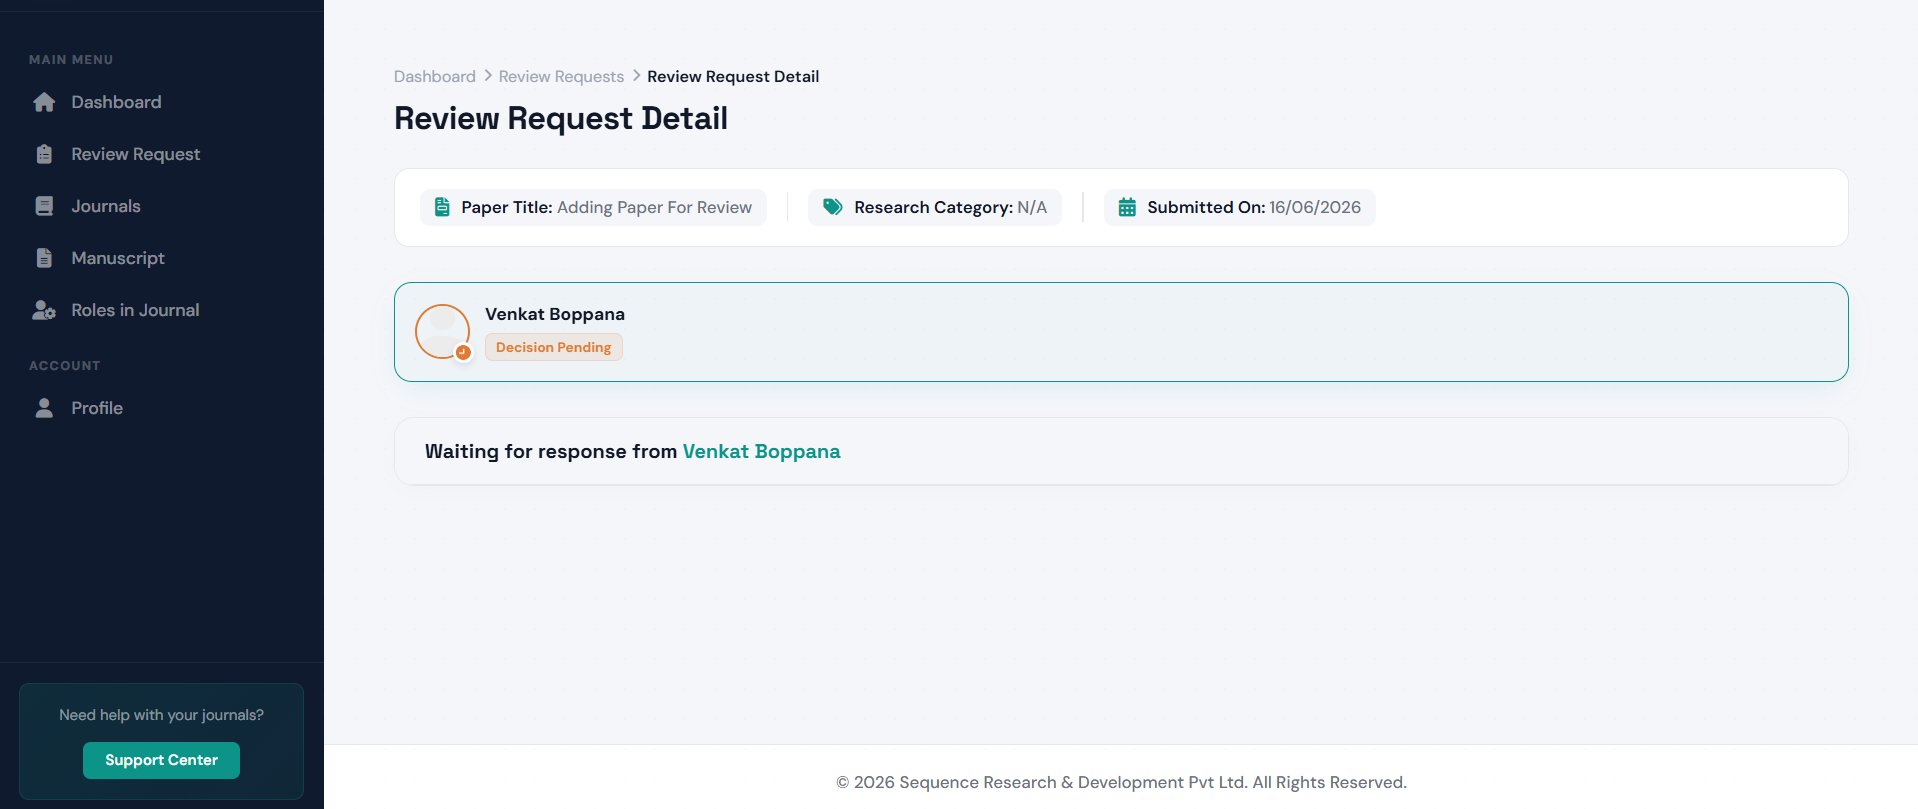
- Awaiting Reviews (Total Reviews): Active review requests assigned to you by journal editors (From Publisher Account). Each request lists the paper ID, title, keywords, submission date, and your submission deadline.
- Awaiting Decisions: Reviews you have evaluated and submitted, but the chief editor has not yet released the final accept/reject verdict.
- Completed Reviews (Archive): Your full historical ledger of finalized reviews. This section stores all your published recommendations and final verdicts.
- Rejected Requests: Review invitations you turned down due to scheduling conflicts or conflicts of interest.
4. How Do You Get a Paper to Review?
You do not have to search for papers yourself. The entire assignment process is handled by the Publisher (Journal Editor) on the other side of the platform. Here is how it works:
A scholar submits their research paper to a Publisher-managed journal on Scholar9 for editorial consideration.
The Publisher (Journal Editor) reviews the submission from their dashboard. They then manually select a qualified reviewer from the list of enrolled Scholar9 reviewers based on domain expertise and matching research keywords.
Once the Publisher assigns the paper to you, a new review invitation instantly appears in your Awaiting Reviews tab. You receive a notification, and the paper details — including keywords, submission date, and your review deadline — are all visible there.
You can choose to Accept the review request and proceed with evaluation, or Decline it if you have a conflict of interest or scheduling constraint. Declined requests are moved to your Rejected Requests tab for your records.
5. How to Review an Assigned Paper
When you open an active review invitation on your dashboard, here are the simple steps to evaluate the paper:
- Download the Paper: Get the manuscript PDF. The author's name, email, and university are hidden so that your review remains completely fair and unbiased.
- Verify Plagiarism Score: Look at the automated plagiarism percentage report to make sure the work is original.
- Rate the Paper: Fill out the grading sheet by scoring the paper on clarity, correctness, and original research contribution.
- Submit Decision: Type your feedback comments for the author and select your final recommendation: Accept, Revision Required, or Decline.
5. Earning Peer Credits & Waiving APC
To honor peer contribution, Scholar9 allocates Peer Credits to reviewers upon successful review submissions:
- Track Credit Ledger: View your transaction history showing credit allocations, date received, and current balances via the Credit History panel.
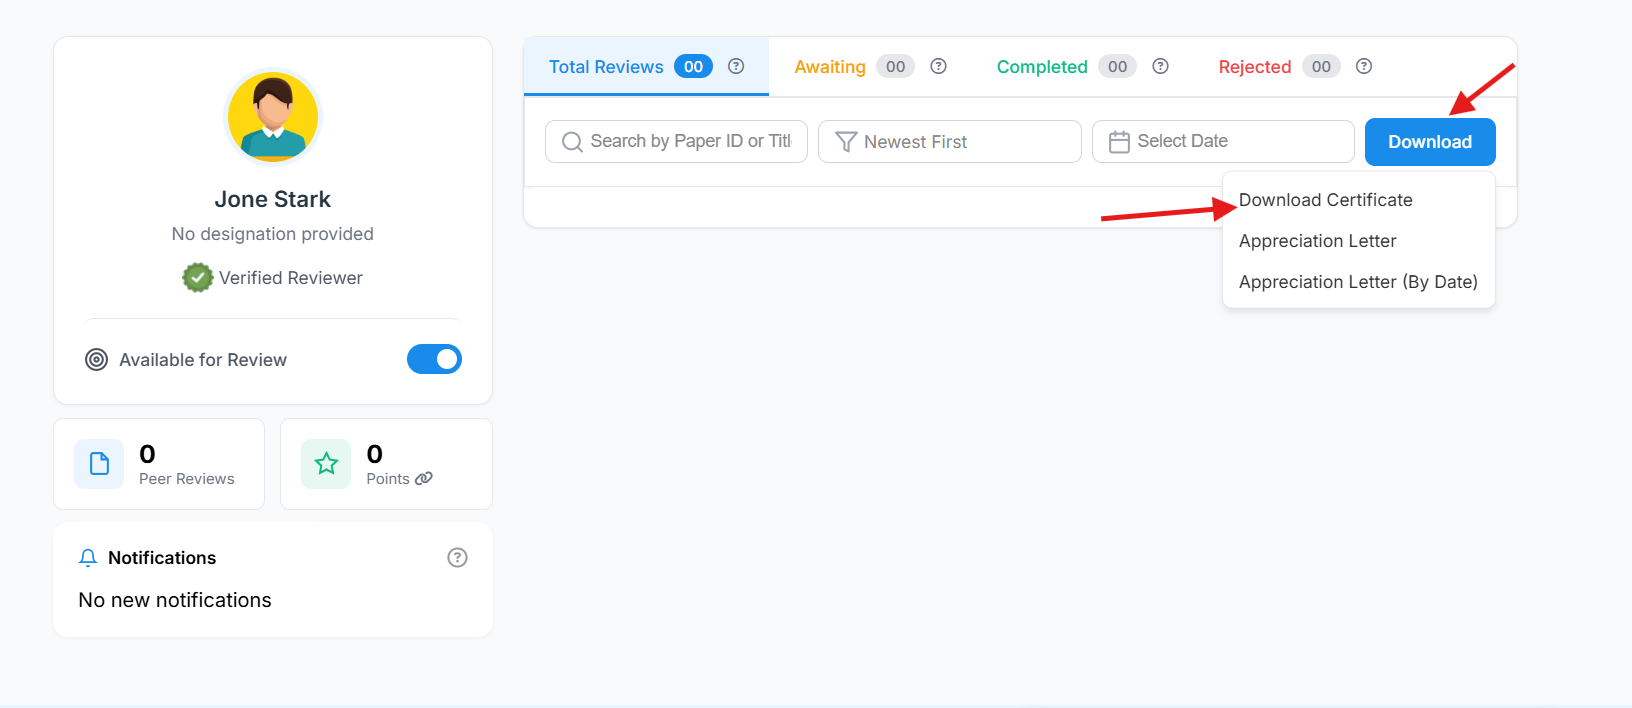
6. Download Official Reviewer Certificates
Academic scholars can download official, printable PDF **Scholar9 Reviewer Certificates** to verify their peer review services for tenure reviews, institutional reports, or professional portfolios.
- Accessing Certificates: Locate any review in your Completed Reviews (Archive) tab and click the **Download Certificate** button.
- Instant PDF Generation: The system verifies your current active organization and credentials, generates a custom landscape-format PDF certificate, and triggers a direct download.